Art DeCamp’s instruction and horn-making techniques were invaluable to me in making screw-tip horns. Thank you, Art, for the class and the extra help you provided. Art has a new web site at:
Samuel Pletcher grew up in southern Lancaster County in the 1750s. He apprenticed to a shoe cobbler, and by the time of the Revolution he was married with a family. One family source says he fought in the war, but this is uncertain. He may have participated in the Lancaster militia, but may have been more valuable making shoes instead. He remained in Lancaster County until 1790 when he and his brother took their families to Howard PA. From here the Pletcher family spread out, with Samuel spending his later days in central Ohio before passing away in 1830.

Samuel was my great, great, great, great grandfather, and it is because of him that I developed an interest in screw tip horns. He would have been making shoes in Lancaster at the same time the horn shops would have been operating, as well as Jacob Dickert and other Lancaster gunmakers. It would be quite reasonable to assume that he owned a horn from one of these shops and perhaps a gun from a maker like Dickert.
My interest in screw tip horns continued to increase when I met Art DeCamp. I took horn making classes from Art in 2008 and 2009. It was between these two classes that I realized that there were characteristics that distinguished Lancaster horns from other screw tips. I had to know what those characteristics were, and I couldn’t wait until the class in the fall. I went to Art’s table at CLA and said, “Art, I know you will tell us about the differences between Lancaster screw tips and other horns, but I can’t wait until the class. Will you explain that now?”
Art patiently began filling me in, and I impatiently waited for the horn class in the fall. I was going to make a horn like my ancestor Samuel probably carried.
Now you see my interest in screw tips, especially those from Lancaster. This topic will be covered in parts with sections devoted to the preparation of the horn spout, turning the base and butt plug, as well as preparing the threaded tip. Again, I wish to thank Art for his help in this project. His information and encouragement have been invaluable.
Links to Parts 1-3
Part 1 of the tutorial deals with making the spout end of the horn. We discuss bits and taps necessary and show the lathe proceedures used.
Making Lancaster Screw Tip Horns Part 1
In Part 2, we prepare the large end of the horn. This includes forming, and lathe turning the horn, as well as shaping and fitting the plug.
Making Lancaster Screw Tip Horns Part 2
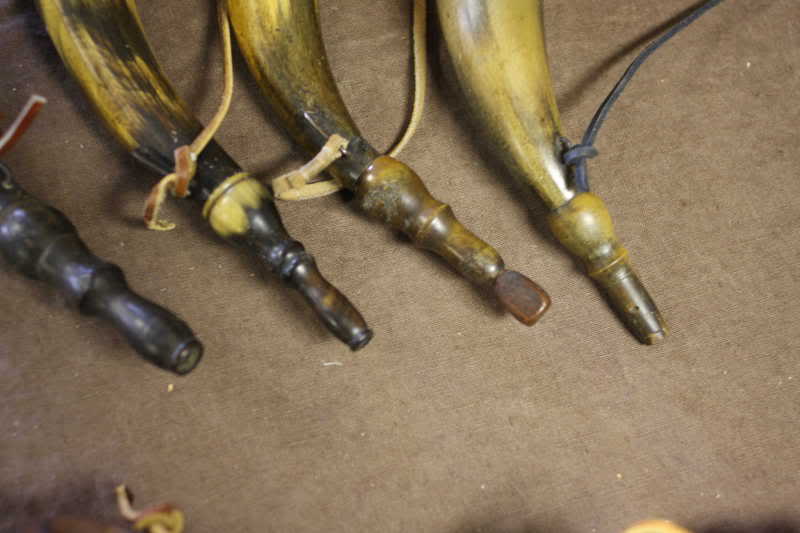
In Part 3 we discuss the making of the screw tip. We limit our examples to Lancaster style and also to using horn rather than other materials such as wood or antler.
Making Lancaster Screw Tip Horns Part 3
Author/Editor’s Notes
Photo credits: The photos used here with a few noted exceptions were taken by me. Most were taken at the horn class at Conner Prairie. I supplemented these with photos from Art. These are identified in the captions. A few more were taken at my home to fill gaps in the photo record.
First a disclaimer:
I do not consider myself a horner. I enjoy teaching and learning, especially learning from knowledgable folks in the area of black powder. Please take this tutorial as a learner who is using this as a chance to organize horn-making information, or take this as a teacher with new information he can’t keep from sharing. However, I’m no horn expert. Art is the expert, and the chance to learn about screw tip horns from him has been a treat.
Lathe considerations:
This project presents unique demands on the lathe. Spinning an object out of round must be done slowly. An electronic speed control is invaluable. Most pulley-driven lathes can be slowed down to 800-900 rpm. Spinning a horn as Art does requires under 300 rpm, and that would be considered too fast. Art estimated his lathe speed at 80 rpm. My seat-of-the-pants calculation was 240 rpm. Having no electronic speed control, I worked out a geared-down belt system that produced a calculated speed is 130 rpm. A little faster would be preferable. Be aware of these speed problems when spinning a horn. Another issue is that the horn will require a larger swing. You will probably need to attach the chuck to the left end of the headstock to have enough swing.
Wood lathe chucks:
The use of the modern chucks simplifies a couple of the operations discussed here. Art uses a face plate with a screw center for the tutorial. This is used when turning the plug in Part 2. With this method, Art must remove the plug to test fit it into the horn. Art is so good at this that he only had to pull the plug twice to get the fit he wanted. I’m not nearly as capable at this. To make up for my lack of experience, I use a chuck that lets me grab the plug from either end. When I turn the taper that fits into the horn, I chuck the large end of the plug, leaving the taper open. I can fit the plug without removing it each time. When I’m ready to finish the exterior of the plug, I reverse the plug. The type of chuck you use will determine the methods you use.
(Larry Pletcher, editor)
Leave a Reply
You must be logged in to post a comment.