Category: Articles

  • Pan Vent Experiments – An Introduction

    Pan Vent Experiments – An Introduction

    [box type=”note” align=”aligncenter” ]Learning how black powder ignites in a flintlock has been a passion of mine for 20 years. In this series of tests we examine the way fire travels from the pan to the barrel. The process involves the use of camera, computers, and a physics interface. What we learn may change the way we think about flintlock tradition.[/box]

    Introduction

    This series of experiments has evolved into one of greater scope than originally intended. Earlier intentions were to examine the ignition qualities when the position of the vent hole varied up or down in relation to the pan. The methods to investigate included a computer timing procedure used to measure times from a barrel stub and lock plate with a pan attached.

    An L&R plate was chosen because the pan was attached. The plate was drilled and attached to a barrel stub with screws. The rear screw is attached to the barrel through a vertical slot in the lock plate. This allows for adjusting the height of the vent hole in relation to the plate.

    At the rear of the plate a hole was drilled to provide a pivot point so that the barrel could be rotated to vertical for loading. The barrel is two inches long but is breeched by using a plug with an octagon shape, providing the same dimensions as the barrel.

    The computer equipment used included a science interface designed for use in high school physics classes. The hardware was designed and built in the late 80’s. The computer is of similar vintage, but the combination allows measuring time intervals to the nearest 10,000th of a second.

    This photo shows the fixture holding the barrel and the photo cells positioned at the pan and muzzle.


    Pan Ignition Experiments

    The experimentation has been broken into phases. The results of each section will be used in successive testing. The plan is to learn enough to control variables for our final experiment, which will be to the measure and evaluate of different vent locations. Each of the following parts is a link to the actual experiment. Methodologies used will be discussed as well as the experiment and the results.

    Part 1 — Black Powder Ignition Characteristics

    (Powder on sheets)  This phase of testing was suggested to me by Mr. Bill Knight. Its purpose is to identify how the ignition travels across blackpowder exposed to the air as in a flint pan.

    Part 2 — Initial Pan Experiments

    (Card between barrel and pan)  The card test was designed to determine the intensity of the flame at the vent. An index card was cut and pinched between the lock plate and the barrel. The pan was primed in three different positions.

    Part 3 — Photography through the muzzle

    In this phase I wanted to see if there was a visible difference in the amount of fire traveling through the vent. I used a digital camera to photograph the fire coming through the vent as seen from the muzzle. The camera is aimed to look directly into the barrel muzzle.

    Part 4 — Priming Powder https://www.blackpowdermag.com/part-4-priming-powder-amount-by-weight/Amount by Weight

    In this part we will examine the amount of priming powder used. Weighed amounts of powder will be timed. Plans call for .5 grains, .75 grains, and 1.0 grains of swiss Null B priming powder.

    Part 5 — Timing Powder locations in Pan (Is it better to bank the powder away from the vent?)

    The technique is to use photo cells to detect pan ignition and start the time. A second photo cell detects fire at the muzzle of the 2 inch barrel and stops the clock.. The methodology for this phase needed careful thought. Informal trials yielded some times that were out of predictable bounds. I suspect they were caused by an unknown variable, perhaps fouling.

    Part 6 — Timing Vent locations (high, medium, low)

    This final test will explore the ignition speed when the location of the vent hole is varied vertically. The test will start with the vent centered on the top of the pan. Other tests will be conducted with the vent as low in the pan as one could expect to find and with the vent located well above the pan center line.

  • Part 1 — Black Powder Ignition Characteristics

    Part 1 — Black Powder Ignition Characteristics

    Black powder ignition in a flintlock pan is different than inside the barrel. Here we look at black powder ignition in open air.

    (Powder on sheets)

    This phase of testing was suggested to me by Mr. Bill Knight. He has been a valued advisor for many years. I poured a measured amount of black powder on a sheet of paper. The powder was ignited by a red hot copper wire in different locations around the pile of powder – center, right, and left. My result was the same as Mr. Knight described. When ignited in the center the burn traveled in all directions equally. In those where the powder was ignited on the edge of the powder, the fire traveled from the ignition point toward the farthest side, away from the starting point. Included here are photos showing this.

    Photo 1 — The burn radiates from the center as we would expect.

    Photo 2 — Burn marks indicate the strongest direction is to the left, away from the ignition point on the right.

    Photo 3 — Burn marks indicate the strongest direction is to the right, away from the ignition point on the left.

    The burns marks above extended well past the area where the powder was placed. In the photos where the pile was ignited to the side, the burn marks extended considerably farther than marks left on the center ignition photo. This test was done with fffg (shown here), ffg, and ffffg powder. Each size left similar burn marks. When testing the ffg powder, I laid out all three sheets of paper side by side, thinking that I would then ignite them one at a time. When I ignited the sheet with the right side ignition, the fire moving to the left was strong enough to jump to the next sheet.

    This test caused me to reconsider the long-held advice to place priming powder at the opposite end from the vent hole. This thought has been around for much longer than I have been involved in black powder. My concern is that if powder is near the outer edge of the pan, it is likely that sparks will land inboard of the powder. The experiment we just did caused me to think that the strongest part of the flame would be from the sparks across the powder- the opposite direction we want. What we desire is for the strongest flame to be at the vent end of the pan.

    Pan Vent Experiments — Introduction

    Part 2 — Initial Pan Experiments

    Part 3 — Photography Through the Muzzle

    Part 4 — Priming Powder Amount by Weight

    Part 5 — Timing Powder locations in Pan

    Part 6 — High and Low Vent Experiments


  • Part 2 — Initial Pan Experiments

    Part 2 — Initial Pan Experiments

    Burn marks on a card help us to determine the intensity of the black powder burn in the flintlock pan. This was a preliminary step to help determine how to prime the pan.

    The card test was designed to determine the intensity of the flame at the vent. An index card was cut and pinched between the lock plate and the barrel. The pan was primed in three different positions. The first was banked away from the vent as tradition suggests. The second was to place the powder in the center of the pan. In last position, the powder was placed as close to the vent as possible without touching. The powder was ignited as in the first test.

    Photo 1 shows the fixture, barrel, and the index card in place for the first test.

    Photo 2 shows the burn marks left on the index card with the priming powder banked to the outer edge of the pan.

    Photo 3 shows the burn marks left on the index card with the priming powder placed in the center of the pan.

    Photo 4 shows the burn marks left on the index card with the priming powder placed in the pan as close to the vent as possible without covering the vent.

    From the first two experiments I am beginning to conclude that is might be best to prime closer to the vent. The next test was designed to gather more information about this possibility.

    Pan Vent Experiments — Introduction

    Part 1 — Black Powder Ignition Characteristics

    Part 3 — Photography through the muzzle

    Part 4 — Priming Powder Amount by Weight

    Part 5 — Timing Powder locations in Pan

    Part 6 — High and Low Vent Experiments


  • Part 3 — Photography through the Muzzle

    Part 3 — Photography through the Muzzle

    Comparing the strength of the black powder burn by looking through the barrel muzzle. Here we see that where the black powder is placed in a flintlock pan is crucial.

    In this phase I used a digital camera to photograph the fire coming through the vent. The barrel is mounted on a fixture and the camera installed on the tripod. Height was adjusted until the camera looked directly into the muzzle. In this position the barrel in centered in the camera and the pan is to the left. On the right side of the barrel directly opposite the vent is a cleanout hole. (The cleanout is important as you view the photos.)

    The pan was primed with .5 grain of Swiss Null B priming powder in three pan positions: banked to the outside, close to the vent, and as close as possible without blocking the vent. The pan powder was carefully positioned using a pencil with a round eraser. Since the eraser was the same shape as the pan bottom, this worked very well.

    The camera was set to have the shutter open for 4 seconds. Once the pan was primed, the procedure was to fire the camera and then ignite the pan. The pan was ignited as earlier with a red hot copper wire. (There is NO barrel powder used until the last phase.)

    Photo 1 shows the muzzle shot taken with .5 gr of Swiss Null B priming powder banked away from the vent.

    Photo 2 shows the muzzle shot taken with .5 gr of Swiss Null B priming powder positioned close to the vent.

    Photo 3 shows the muzzle shot taken with .5 gr of Swiss Null B priming powder positioned as close to the vent as possible without covering it.

    Examination of the photos add evidence for stronger ignition with closer placement of the pan powder. Comparing the photos showing the close position and the “banked away” position shows a clearly stronger fire in the barrel and also traveling through the cleanout hole on the far side. While evidence continues to support a close priming of the pan, only timing of the positions will provide conclusive proof. That comes next.

    Pan Vent Experiments — Introduction

    Part 1 — Black Powder Ignition Characteristics

    Part 2 — Initial Pan Experiments

    Part 4 — Priming Powder Amount by Weight

    Part 5 — Timing Powder locations in Pan

    Part 6 — High and Low Vent Experiments

  • Part 4 — Priming Powder Amount by Weight

    Part 4 — Priming Powder Amount by Weight

    Determining the amount of black powder to be used in testing. Since flintlock pans are of different size, I felt that this was a necessary step in our process.

    In this phase of testing I timed different amounts of priming powder. Ten amounts each of .5 grains, .75 grains, and 1.0 grains of Swiss Null B priming powder were weighed to the nearest tenth of a grain. These were timed in the fixture to see if varying the amount of prime affects the speed or consistency.

    The fixture allowed the barrel to be rotated to vertical to load 15 grains of Swiss fffg for the barrel powder. The barrel was then rotated to level and the pan primed. Photo cells were checked to make sure they are pointed at the pan and the muzzle. The last step was to make sure the computer was ready. The pan was ignited with a hot copper wire and the readings recorded. The barrel was wiped between trials.

    Photos of the fixture are shown below.

    These two fixture photos also show the range of movement that can be used to test the location of the vent hole in relation to the pan. The top photo shows the hole in it’s lowest location, while the bottom photo shows highest location. For all tests so far, the vent hole has been centered on a line level with the top of the pan.

    The graph below shows the trials with the three different priming powder amounts:

    In evaluating the results of this test, I found Joe Sharber to be of great help. Joe, a fellow blackpowder fan with statistical experience, provided help with the number crunching. He pointed out that there is no statistically significant difference in the average ignition times. However he also noted that the variability or standard deviation was statistically significant.

    Joe suggested that the term “Coefficient of Variation” * may be of value as a measure of consistency. The CV listed in the chart helps to show the advantage in consistency of the trials done with .75 grain priming powder. Because of this .75 grain will be the powder amount used in future tests.

    * Coeficient of Variation is defined as 100 x (standard deviation divided by the mean). It is given as a percent. My thanks to Mr. Sharber for his assistance.

    Pan Vent Experiments — Introduction

    Part 1 — Black Powder Ignition Characteristics

    Part 2 — Initial Pan Experiments

    Part 3 — Photography through the muzzle


    Part 5 — Timing Powder locations in Pan

    Part 6 — High and Low Vent Experiments


  • Part 5 — Timing Powder locations in Pan

    Is it better to bank the black powder priming away from the vent? This piece of conventional flintlock wisdom will be tested.

    Part 5 of our test series will examine the question about where in the pan provides the best ignition. Conventional wisdom has told us that banking the priming powder away from the vent will produce the fastest ignition. Practically avery black powder shooter has heard this. This theory is based on human senses or what looks and sounds fast. The current test is designed to see if conventional wisdom is correct.

    Early attempts showed a trend developing but had results that did not fit the rest of the range. A careful plan was developed to remove as many variables as possible especially those that were caused by fouling. Between firings the following were done:

    The barrel was wiped. An additional step was added here and explained in the video.

    A pan brush was used.

    A pipe cleaner was used in the vent.

    Compressed air was blown into the vent.

    The priming powder used was Swiss Null B weighed on a balance scales. Since earlier testing showed its consistency, .75 gr was used. Because the placement of priming powder was the variable, care was used in its placement. The charge was poured into the pan and moved into the test positions using pencil with a rounded eraser. Powder could be pushed to the outer edge of the pan as well as very close to the vent. In both of these positions I felt that I was using more care in the powder placement than the normal firing of the lock in the gun. I realized that I chose the extremes in powder placement, and that a shooter would fall somewhere in between.

    The tests were run in a 24 hour period with temperature controlled by thermostat. The day was picked with humidity in mind. The humidity varied within a range from 60 – 66 %. This is noted on the spreadsheets. Each battery of tests consisted of ten trials each – prime banked away from the vent, and prime placed as close to the vent as possible without covering it. To insure that no priming method had a unfair advantage, the trials were alternated so that a complete test battery included 10 trials each, alternated for a total of 20 trials.

    At the end of the test session the ten trials for each priming method were recorded and all parts cleaned. Battery 1 was done in the afternoon at 60% humidity. Battery 2 was done in the evening at 66% humidity. The final battery was done the following morning at 60% humidity.

    I made a short video that showed the processes involved:

    The results are shown in the spreadsheet below.

    The obvious conclusion is that banking the prime away from the vent doesn’t produce the most rapid ignition as we once thought. Banking the powder way from the vent actually reduced the ignition speed by 16%. This conclusion runs counter to conventional wisdom heard for years in muzzle loading circles. However, it is consistent with earlier tests where we saw photos with brighter fire from a close positioning of the prime.

    While these results change the way I will prime my flintlock, there are other considerations that must be dealt with. In my tests the pan was ignited by a copper wire heated red hot. In the real flint world the sparks need a bed of powder on which to land, and this must be part of or priming procedure. This means that when I prime my locks, my emphasis will be close to the vent rather than away from it, but the bottom of the pan must have sufficient prime for sparks to land in. Thus, how well a lock places its sparks in the pan becomes an equally important consideration.

    One other result of this experiment is that I have become increasingly skeptical of human senses in how I perceive flintlock ignition. And, there are more questions. What about low vent locations? This has always been rejected as a cause of slow ignition. Maybe we’re wrong about that as well. We’ll look at that in Part 6.

    Pan Vent Experiments — Introduction

    Part 1 — Black Powder Ignition Characteristics

    Part 2 — Initial Pan Experiments

    Part 3 — Photography through the muzzle

    Part 4 — Priming Powder Amount by Weight


    Part 6 — High and Low Vent Experiments


  • Part 6 — High and Low Vent Experiments

    Part 6 — High and Low Vent Experiments

    Low vs High Vent Test Phase . . . . Where should the vent be positioned for best black powder ignition? Again, conventional flintlock wisdom is tested.

    Up until this phase of the experiments the vent hole has been located level with the top of the pan. In those trials other variables were being examined. In this phase, the location of the ventis the variable. The lock plate has been adjusted to place the vent at the bottom of the pan. Actually the outside edge of the exterior cone is at the bottom of the pan.

    Most shooters with this vent location use care to avoid covering the vent. In the first set of trials I primed three different ways:

    1. Prime banked to the outside

    2. Prime level in the pan (I tapped the fixture to level the prime.)

    3. Prime close to the vent and covering it completely.

    The equipment used was the same: computer, physics interface, photo cells, and the fixture for holding the barrel and lock plate. The location for the photocells remained the same. Priming charges were kept covered until they were used.

    The amount of the prime for this test remains .75 grain of Swiss Null B priming powder. (This amount has been shown to be the most consistent in previous tests.) The methods used are the same as in earlier tests. The video link below shows the process. (This is the same video as in Part 5.)

    Because I was worried about fouling causing unreliable data, every effort was used to eliminate it as a variable. As in the earlier tests, the following steps were used to prevent fouling from affecting the data:


    Wipe barrel between shots.

    Second cleaning rod designed to wipe the vent liner.

    Pan brushed.

    Pipe cleaner used through the vent.

    Compressed air through the vent.

    While these steps may seem unnecessary for normal shooting, I felt justified when trying to obtain meaningful data.

    Below is the data gathered for the low vent test:


    It is worth noting that the trials covering the vent and the level prime were as close as they were. I suspect that there is no statistical difference between these two variations. Both, however were faster than banked away. They were 15-20% faster, in fact. I’ll draw no further conclusions until the high vent location is timed.

    High Vent Test Phase

    As I worked on the high vent phase, humidity became a concern. I was uncertain if I could maintain a comparable humidity when this phase was done. Earlier testing had been done with humidity in the 50-60% range. I waited for weather to help me, but found that by using an air conditioner in the garage I could keep the humidity within this range. Humidity at the beginning of the test was 58% dropping to 51% as the testing concluded. Temperature throughout testing was 63-64 degrees.

    The only variable in this phase was the location of the vent. The lock plate and pan were rotated to place the vent as high as possible. The bottom edge of the exterior cone on the vent was well above the level of the pan. Please note the photo showing the vent hole.


    The procedure was to time 15 tries with each of three powder locations in the pan – just as I did in the low vent tests. The tries were alternated as follows: powder banked away, level prime, and as close to the vent as possible. In this last location, I had intended to cover the vent, but .75 grain of powder was not enough with the vent located this high. I considered increasing the charge to 1.0 grains, but concluded that it would introduce another variable. I decided against that and used a pencil eraser to position the prime as close as possible.

    After each location was timed 5 times, I removed the barrel and cleaned everything. Then I timed the next series. After 10 times I again cleaned, and then timed the last group.

    The chart that follows shows the data gathered. As happened in the low vent trials, banking the powder away was slower and less consistent than level or close to the vent. Close positioning of the prime was decidedly faster and more consistent.

    Photobucket

    Conclusions:

    These conclusions are those of the experimenter. You may have different opinions.

    I wish to point out that every trial produced a report that sounded as one sound. The fastest (.032) and the slowest (.060) sounded the same. Even though one was almost twice as fast as the other, the sounds were indistinguishable. So my first conclusion is that the human eye and ear are terrible tools to use to evaluate flintlock performance. If differences can be determined by human senses, then the trial was indeed very slow.

    The idea to bank powder away from the vent to improve flint performance is flawed thinking. In every test I conducted, the banked away trials came in last. Percentages varied, but banking the powder away was always slower. I found no evidence to support the old “bank the prime away from the vent.” (In the low vent test, banking powder away was 17% slower; in the high vent test, banking powder away was 23% slower.)

    The idea that one should not cover the vent with priming powder because of having to burn through the vent instead of flashing through seems equally flawed. While I did not try to fill the vent, covering the vent did not cause slower times. The closer I could get priming to the vent, the faster and more consistent the results. In fact the consistency I found in positioning the priming powder close to the vent occured at all vent positions – low, level, and high.

    The last conclusion involves the reason for this whole experiment – proper location for the vent in relationship to the pan. I found that the location of the vent in relation to the pan is far more forgiving that we have believed. Tests when the vent was extremely low or high both gave quick reliable ignition. A look at the chart below shows that all vent positions gave fast ignition when primed close to the vent (This is what we learned in the preliminary tests.) Also all vent positions gave uniformly poor performance when the priming powder was banked away from the vent.

    ————————–Banked way—————-Level Prime—————-Close prime

    Low Vent—————–.046—————————.037—————————-.038

    Level Vent —————.043—————————- * —————————–.036

    High Vent—————–.048—————————.043—————————-.037

    *I did not time level priming when testing the level vent/pan position.

    I began this series of test thinking that the big variable would be the vent location. However, I am now concluding that it is of minor concern compared to the location of the priming powder in the pan. I still like a vent level with the plan flat won’t loose sleep over a pan a little high or low.

    All of the work represented here was based on igniting the powder “artifically” using a red-hot copper wire. This was done intentionally to remove the variables in amount, quality, and location of the sparks. In reality the flint shooter must manage his lock to minimize these variables. Regardless of what the experiments show us, the shooter must place priming powder where his sparks will land. Time with his gun will determine this. However the shooter need not be afraid of priming powder too close to the vent – that is to be encouraged. It is far better to have the prime too close than too far away.

    Pan Vent Experiments — Introduction

    Part 1 — Black Powder Ignition Characteristics

    Part 2 — Initial Pan Experiments

    Part 3 — Photography through the muzzle


    Part 4 — Priming Powder Amount by Weight

    Part 5 — Timing Powder locations in Pan

  • Pan Vent Experiments – Continued

    Pan Vent Experiments – Continued

    In my earlier article called “Pan Vent Experiments”, I examined powder placement in the pan and timed vent locations. I found that pan placement was far more forgiving that we thought. I found that a vent covered with prime did NOT slow ignition as we once thought. In fact priming powder located as close as possible to the barrel was the fastest way to prime. In this photo article, I will look at the possibility that a vent can be placed too high.

    The series of photos included here are in response to comments generated in a number of internet forums the author reads. I have timed low, level, and high vent locations and found no significant difference in ignition times. Questions still surface about the preferred location of the vent. Until these ignition tests and these photos, all we had to go by was human senses. The best gun makers in the world early or modern had no better tools of discovery. Decisions they made were made without the benefit of an ability to test their theories. If the performance of the flintlock passed their “human sense test”, it was deemed correct. Now we can actually review their decisions about vent placement with test results they never had.

    All earlier photos that I took were with the vent in the “level” position. The purpose of those photos was to examine other variables. Here the only variable will be the height of the vent. I took three photos at each of the following vent locations:

    a. vent located .030” above the top level of the pan

    b. vent located level with the top of the pan

    c. vent in the bottom of the pan

    The reason for multiple photos is that I hated basing any conclusion on only one trial. I set the camera to look into the muzzle. The aperture was f13 and the shutter held the lens open for 4 seconds. A cable release was used to make the operation easier. I primed the pan with the powder as close as possible to the barrel. Earlier tests showed this to be anywhere from 15-25% faster. In the low vent position the prime covered the vent. This is of no concern – contrary to popular belief, this does NOT result in slower times.

    The vent locations were photographed three times with 1/2 grain of Swiss and ¾ grain of Swiss. These charges were weighted. The results of the different amounts of powder were very similar. I chose to upload the ¾ grain photos. Here are the photos of the vent .030” above level with the pan top:

    PhotobucketPhotobucketPhotobucket

    Here are the photos with the vent level with the pan top:

    PhotobucketPhotobucketPhotobucket

    Here are the photos taken with the vent at the bottom of the pan:

    PhotobucketPhotobucketPhotobucket

    One additional photo was taken because most shooters use more priming powder that the ¾ grain used in this test. My pan charger is advertized to throw 3 grains. I used it for this final trial in the low vent position:

    Photobucket

    Conclusions drawn here are based on these photos and the data collected in the earlier article. A strong argument can be made for the level vent location used by the majority of flint makers. Numerical data supports this, and these photos show a strong flame moving through the vent. My rifles use this location and I see no advantage in changing them.

    An equally strong argument can be made for the low vent location. The photo evidence also shows an impressive flame front to go along with good timing numbers. If my rifle had a low vent, I would not change it.

    I question the location tested here with the vent located .030″ higher than the top of the pan. The flame traveling through the vent is noticably less than the the other positions. I timed a high vent position earlier, but I did not specifically set the vent to the 030″ position photographed here. Since high vent data gathered earlier was not precisely placed, it may not be valid here. Based on the weak flame seen inside the barrel, I tend to conclude that .030″ may be too high for best ignition.


  • Load Compression and Accuracy

    Load Compression and Accuracy

    We attempt to measure the effect of seating pressure on black powder ignition in both percussion and flintlock rifles. – Larry Pletcher and Steve Chapman

    The purpose of these compression tests was to find out how flint and percussion rifles would react to changes in compression as the ball was seated on the powder. My personal method has been to use firm and consistent pressure whether I was shooting a percussion or a flint firearm. Many of my friends hold similar opinions. However I recently heard varying opinions and wanted to find a way to measure how different guns react to pressure changes.


    I was pleased to have Steve Chapman, shown in the photos, help conduct these tests. Steve is a member of our local club and shoots at five other clubs. His shooting abilities eliminated variables that my shooting would have introduced. We also used his rifle which is convertible from flint to percussion. Having Steve and his rifle meant that all the gun handling was done by the same person, with the same rifle, and with the same equipment.


    In order to load with identical seating pressures throughout a 5 shot group we adopted a method used by black powder cartridge shooters. We measured pressure not in pounds but in inches of compression. In our tests we used a stop on the ramrod that was set in the following 4 ways:

    a. no compression

    b. 1/16” of compression

    c. 1/8” of compression

    d. 3/16” of compression.


    A collar was made with a set screw that could be firmly attached to a steel bench rod. This rod’s sole purpose was to seat the patched ball. The first setting was determined by seating a ball to just touch the powder. The collar was lowered 1/32 inch and attached. This left the ball “just a hair” above the powder. Each additional 5 shot group was loaded after adding a 1/16” shim between the muzzle and the collar and reattaching the collar.

    The rifle was wiped with a wet and dry patch between shots. We were concerned that if the breech was not cleaned well, fouling would take up additional space, increasing the length of the powder charge, and alter the compression. We feel that thorough cleaning prevented this from happening.


    We fired the rifle at 25 yards off a bench and through a chronograph. We recorded the velocities of each shot and noted those velocities on the targets as they were done. Our load was a .400 cast ball (Lyman mold) and pocket drill for patches. The patches were lubed with Murphys oil soap and cut at the muzzle. A powder charge of 40 grains of Goex fffg was used throughout all testing. After the velocity and ball placement on the target were recorded, a piece of black target paper was placed behind the target to improve the sight picture for the shooter. In effect the target was a fresh one for each shot. After firing the four groups in the flint gun, the vent liner was replaced with a percussion nipple and a mule ear percussion lock was installed. Then we repeated the four groups with percussion ignition.

    Each 5 shot group was measured at the widest point and the width of the ball was subtracted to arrive at a center-to-center group size. The following chart shows the group sizes and the compression:

    Compression —————– Flint —————- Percussion

    1. None ——————- .92 inch ————– .53 inch
    2. 1/16 inch —————.84 inch ————– .85 inch
    3. 1/8 inch —————–.85 inch ————– .55 inch
    4. 3/16 inch ————– .46 inch ————— .41 inch


    Interpreting results can be tricky and should perhaps be left to the reader. My impression is that as a flintlock, the gun liked compression and responded to compression with smaller groups. The percussion version also liked compression but seemed a little more forgiving as far as the amount of compression used. The percussion shot far better with no compression, but when compression was added, both versions ended up essentially the same.

    The obvious limitations of this test are that it was done on only one gun and only one powder brand. Will other guns or powder varieties respond the same way – only more testing will tell. Will this test change my loading? On flint guns the answer is probably yes. I will run more tests on my gun, but the seating pressure I normally use on my flint gun is too light based on this test.

    Ideas for further tests might include:

    1. Pre-weighing powder charges on a scales
    2. Weighing and culling the balls
    3. Using aperture sights
    4. Attempt the test on a day with more consistent light conditions
  • Slow Motion at Gun Makers’ Hall

    Slow Motion at Gun Makers’ Hall

    Are you interested in watching an original J. Manton flintlock in slow motion? How about a wheel lock? BlackPowderMag was able to do just that at Friendship this spring. With help from blackpowder riflemaker, David Price, and Grant Ferguson from Olympus, we filmed 30+ flintlocks at 5000 frames/second.

    History was made at Gun Makers’ Hall during the Spring Nationals at Friendship this year. Blackpowdermag.com and Olympus Industrial collaborated on a slow motion project. Grant Ferguson from Olympus set up a digital video camera capable of 33,000 frames /second under the pavilion behind Gun Makers’ Hall. The goal was to tape as many flintlocks as we could, furnish the shooter with a CD copy, and give the NMLRA a copy of all our work. In all, we were able to give 33 different digital files to the NMLRA.

    David Price has just fired a flintlock for the camera.

    D_Price3_smv

    The background behind this project started back in the fall of 2006. In a phone conversation, Grant Ferguson and I first discussed the possibility of taping both locks and the firing of a rifle. After a number of conversations we agreed that it might be helpful to try this by ourselves instead of having onlookers present. If we failed, we would rather not have an audience.

    In January of 2007 Grant brought his equipment to northern Indiana, and we had our first try in my garage. By juggling a couple antique cars around, we had a heated space to work. During this time we taped a large Siler that has been the subject of many experiments over the past 20 years. We digitally recorded this lock in a number of “flint/bevel/priming powder” combinations. The lock even got a chance to perform up-side-down. Besides taping another lock with no frizzen spring, we recorded a flint rifle from the front so we could see lock ignition, vent hole ignition, and the ball exiting the rifle. (Just in case you wondered, a years’ worth of “Guns and Ammo” duct-taped together makes a good bullet stop for a limited number of tries. Dixie Gun Works catalogs aren’t bad either. — Remember, don’t try this at home.)

    Grant Ferguson, Olympus Industrial, is shown working with the camera interface.

    G_Ferguson1_smv

    Armed with the knowledge gained from this experience, I contacted Barbie Chambers, Dick Miller, and Roland Martin to get their take on the project. With their approval we looked for a date during the Spring Shoot. Barbie Chambers is the events planner for the Hall, and we soon had our date. As the time approached, I found a number of gun makers and ML fans willing to help. David Price, maker of the swivel breech raffle rifle, deserves much praise for his assistance. He volunteered to help me out, and as we were about to start, I mentioned that I hoped to use the same priming powder for all locks. David’s reply was, “I think the same person should prime all the locks too.” And he did just that. It allowed me to burn disks for the shooters and line up the next lock to record.

    David Price (center) discusses the project with observers.

    D_Price1_smv

    As we worked, the number of shooters grew and kept us busy most of the day. At one point Barbie came by with four locks from the Chambers booth. One was an original J. Manton from a fine smooth bore double. That had to be a highlight. Another was a wheellock. Leon Buckwalter’s lock is the only wheellock ever taped in slow motion – at least this slow. The frame speed we used for all locks was 5000 frames/second. At this speed it takes perhaps a minute to show the complete ignition sequence. An even faster frame rate could have been used, but the size of the screen would have been reduced. We felt this was a good compromise.

    Leon Buckwalter prepares his wheel lock.

    L_Buckwalter1_smv

    From my experimenter’s point of view this was a great day. We gathered a wealth of material from which to draw data, and I think we proved that this media could be used to improve lock function. Another experimenter feels the same way. Lowell Gard of “Bevel Bros.” fame asked if we could video his lock with varying numbers of trials on the flint. He wanted to see if we could see the flint deteriorate as the trials increased. We started with a new flint and worked up to 50+ trials.

    All in all, it was a great day for students of the flintlock. I believe every lock owner received a working video of his locks. The NMLRA received them all. Lowell offered to place a few CDs at the Bevel Bros. booth if shooters were interested in purchasing the complete set. We may give that a shot this fall.

    Patch box side of David Prices’s swivel breech rifle. This superb piece will be raffled in the fall..

    D_Price2_sb

    I chose to include slow motion videos of the J. Manton and the Buckwalter wheel lock. The Manton locks from the late flint period are, in my opinion, the finest locks made. The wheel lock is included because I don’t think one has ever been photographed at this speed.

    I wish to thank Grant Ferguson for his effort in this project. Without his camera and special abilities, we certainly could not have attempted this. Grant, I hope we get a chance to work together again. David Price worked all day long with me, and I appreciate his help. I also thank him for the opportunity to handle his beautiful swivel breech. Thanks also to Barbie Chambers and Dick Miller for allowing us to work at Gun Makers’ Hall. And last of all, a thank you to all the shooters who brought locks for us to record. I appreciate your willingness to share your lock with us.

  • Lead vs Leather Flint Attachment Study

    Lead vs Leather Flint Attachment Study

    A flintlock needs a secure method of attaching the flint. There is spirited disagreement on the best way to do this. Whether to use lead or leather is the subject of this study. Perhaps this study will help your flintlock to ignite black powder more quickly. Because of the recent discussions about attaching flints with both lead and leather, I decided to see if I could use photographs to study the problem. An experimenter does not dare approach his work with a preconceived answer, and I assure you that I have “no dog in this fight.”

    I began by selecting two chipped English flints as close to the same shape as I could. I glued a piece of leather to one and make a lead wrap for the other. I hammered the lead fairly thin and trimmed off all that was unnecessary.

    Previous experience with timing locks has allowed me to conclude that the first strike of the flint is never the fastest in a series, so both flints were struck 3 times before the photography started.

    With the lock mounted in the fixture, I set the camera for a 4 second time exposure. I opened the shutter and fired the lock during the 4 second delay. All sparks made during the strike are shown in the pic.

    During the first session I fired the lock 5 times and then turned the bevel down and fired 5 more. Then the other flint was installed and I repeated the process. Both flint/lock combinations worked slightly better with the bevel up.

    In the following series of photos, Leather and Lead photos will appear  in the order each group was taken.  Leather will be first in a pair, followed by the Lead photo. Photo captions identify the method of attachment and the number of the trial.

    Leather_BU_1
    Leather_Bevel up_Trial #1
    Lead_BU_1
    Lead_Bevel up_Trial #1


    Leather_BU_2
    Leather_Bevel up_Trial #2
    Lead_BU_2
    Lead_Bevel up_Trial #2


    Leather_BU_3
    Leather_Bevel up_Trial #3
    Lead_BU_3
    Lead_Bevel up_Trial #3


    Leather_BU_4
    Leather_Bevel up_Trial #4
    Lead_BU_4
    Lead_Bevel up_Trial #4


    Leather_BU_5
    Leather_Bevel up_Trial #5
    Lead_BU_5
    Lead_Bevel up_Trial #5

    I did another set that continued the sequences until the flints were knapped. However, those showed nothing substantially different from the pics above.

    In this experiment I tried to keep variables to a minimum. The same lock is used; BTW same lock that was used for the slow motion stuff earlier. The flints were mounted the same – as best I could. Photography methods were the same. The flints and the method of securing them were the variable. The fact that two flints were used means that they could wear at different rates.

    If I were to draw a conclusion it would be that I can not see significant differences in the performance of the two methods. I doubt that I would be at a disadvantage with either method. However, this is a very well-made lock and others may act differently. Your conclusions and mileage may vary.

    (Reformatted 9/29/2016, Larry Pletcher, editor)


  • Conner Prairie Traditional Arts and Arms Making Workshop

    Conner Prairie Traditional Arts and Arms Making Workshop

    The Conner Prairie 17th Annual Traditional Arts and Arms Making Workshop is history. Flintlock fans came from California to New England to learn from a core of talented instructors. A majority of the students come back year after year. Take a look at what you missed and what is in store for next year. If you shoot black powder, you’ll want to see this.

    I had heard about the Conner Prairie classes for quite a number of years. I knew some of the instructors because of visits to the National Shoots at Friendship. I learned about the date for this year’s classes from Lee Larkin at the Fall Shoot. Lee gave me a folder describing the classes and encouraged me to come. Lee’s class on horn-building would be one of many classes offered this year, many of which I would like to take. I decided to make arrangements to do an article for BlackPowderMag, reporting on the classes this fall and to help promote the class offerings for the fall of 2007. Nathan Allen is the Manager of Historic Trades at Conner Prairie. He liked the idea of promoting the classes, and we arranged for me to visit on Tuesday.

    IF

    When I first walked in I was surprised at the facilities. The blacksmith shop is the best place for teaching blacksmithing that I’ve seen. Boasting 10 forges with electric blowers, the shop was extremely well equipped. With an instructor for every 6-8 students, the opportunity for learning couldn’t have been better. Nathan Allen and Melvin Lytton were the instructors for tomahawk making. I had a chance to photograph students and instructors as they worked. Each of the students would make four tomahawks during the week. Each step in the process would be completed on all four hawks at once, giving the student a chance to become proficient at that step before beginning the next step. In the five day hawk class, the students made four Fort Meigs style hawks. On the previous 2-day weekend class, students made four pipe tomahawks. It would have been easy to stay here and learn, but there were more cool things to photograph. I walked away thinking that I need to take this class.

    Nathan Allen was in charge of the tomahawk forging
    Nathan Allen was in charge of the tomahawk forging


    Hershel House at the forge
    Hershel House at the forge
    Another photo of Hershel
    Another photo of Hershel

    Next to the hawk forges were the fellows making knives under the supervision of Hershel House. I knew Hershel from the rifle-building seminars at Bowling Green Kentucky, but I was only one of many students Hershel has taught, and I’m not sure he remembered me. But, he treated me like one of the family and invited me to get involved. He was about to draw the temper on a blade, and in a moment the students and I were watching colors showing in the blade. As I looked at the various knives being made, I noticed that while the knives were all unique, they all had hand forged blades and many had antler handles. The students’ knives varied in size from quite large to delicate little patch knives. Again I came away thinking that this was another class I need to take.

    IF

    Lee Larken with his students
    Lee Larken with his students

    My next stop was the horners’ corner. Lee’s students were shaping the horns and finishing the plugs. Dye was being heated, and the horns began to take on that 200 year old look. I took photos throughout the day, returning to see the students ready for a new step. Again, a small student/teacher ratio paid off as students got much individual attention. On one of my last trips to watch the horners, Larkin was showing his class tips and tricks for engraving their horns. From blade shapes and sharpening to actual cutting techniques, Lee’s students seemed well prepared for the engraving step. I regretted that I would not see their finished products. It’s another class I need to take.

    Jim and Mike in conversation
    Jim and Mike in conversation

    Through the next door is the kit assembly class. Here Jim Chambers, Mike Brooks, and John Weston assisted students to get the rifle components together correctly. Jim and Mike are subjects of BlackPowderMag interviews elsewhere on this site. I have known each since the ‘80s. All three are very capable instructors, stepping in frequently to show the students their techniques. If a student needed extra inspiration, he would only need to walk over to a rack of finished guns brought by the instructors. Among them is perhaps the most beautiful flintlock rifle I have ever seen. This rifle was on a tour of various art exhibits, including Conner Prairie called: “Three Centuries of Tradition: The Renaissance of Custom Sporting Arms in America”. Jim Chambers can be justifiably proud of it. As I was looking at it, I heard one of the instructors say, “That is the finest flintlock in America.” I won’t argue with him.

    Jim at the bench
    Jim at the bench

    The next class is stock carving. Here James Klein has a group of students at work on various styles of stock decorating. Some are working on “Quaker” stocks, while others are working on a stock from a project at home. James also has a stock to carve as he works with the students. They can see Klein demonstrate the technique before they attempt it. These students also have the advantage of working with a unique swivel vise that Conner Prairie has provided. It allows the builder to hold the stock in about any angle he chooses. I had a chance to see students working on about every phase of stock carving from the drawing the pattern to contouring the raised parts of the carving.

    John Schippers
    John Schippers

    The engraving class was nearby. John Schippers was the instructor. John has retired from Conner Prairie, but returns to teach. In earlier years John had much to do with the development of this program. Besides his early contribution, the class benefits greatly when John returns to teach engraving. He and his students use an elevated vice that permits a straight back while working. As in other classes the small student /teacher ratio helps students make great progress during the week. In addition to the personal attention John can give students, he is working on a book which will allow the student additional access to John’s engraving skills. His book, called Custom Engraving, is soon to be published. Other instructors spoke highly of John’s book, one saying he knew he could learn from it.

    Glen Sutt hard at work
    Glen Sutt hard at work

    Down the hall was the last of the five day classes. The trade silver class was taught by Don Secondine. Students again benefited from a small student/teacher ratio. Don first assisted the class in making a battery of punches to use in decorating the silver project. When I was there the students were finishing the punches and beginning the layout of their project. Some had begun stamping. This class contained a number of women who were interested in making trade silver. Some had husbands in other classes and decided to accompany them, enrolling in a class of their own. As in other classes, it would have been good to see the students’ work at the end of the class instead of just the second day. I’m sure the pride of completing the project would have been worth getting on film.

    Barbie working on a bowl
    Barbie working on a bowl

    IF

    The pottery class is another of the three day classes. The instruction here was one to one as Larry Gilliam and his assistant had only two students. Both were working on wheels when I was there. Barbie Chambers, Jim’s daughter was working on a deep pie pan. Photos in the gallery of this magazine will give some idea of the variety available in the class. I was impressed with how well the students managed the wheels.

    There were two classes that did not meet until the last half of the week. Ken Scott will teach a class making leather pouches and bags. I have seen Ken’s work at gun shows and wish I had not missed his class. Robin Scott will teach a course in quill work during the second half of the week. This is another skill where I have little knowledge, but for which I have great admiration.

    This was an impressive week. The instructors were superb and must have had fun working with such motivated students. The equipment and environment provided by Conner Prairie was second to none. As I moved from class to class, I often felt that I need to come next year and take classes. Many of the students voiced this opinion. A high percentage of the students are returning former students. One student had been here for nine years. If there could be a better endorsement I don’t know what it would be.

    Larry Pletcher, editor

  • Is Black Powder Calling You?

    Shooting black powder is addictive.  While there are many kinds of shooting to be enjoyed in America, shooting black powder, especially in a good flintlock, is my favorite.  To many like me, hunting with a black powder gun, whether it be a rifle, shotgun or pistol, adds immensely to the sport.

    No matter what type of hunting we do, we all enjoy the chance to be out opening day.  I like getting to my stand quite a while before the legal hour.  I enjoy having to wait until my eyes are used to the dark.  Having walked this path before, I know what the path is supposed to look like.  When I get to the stand I know my gun isn’t primed; I can’t see my sights yet.  Even after getting settled in my stand I don’t prime my flintlock.  It will be 30 minutes before I can see my front sight.  I listen for the woods to wake up.  It seems that the woods wakes up in small steps.  Maybe it’s a couple of small birds.  Maybe it’s an opossum wandering under my tree.  I hear him a long way off and wonder if he’s a deer.  As time passes I can finally see the front sight on the flintlock.  I prime my lock with 4fg black powder and continue to wait for the shooting time to arrive.

    Part of the satisfaction in hunting with black powder firearms comes from the extra challenges.  Is my priming powder dry?  Will my flintlock or set trigger make a click the deer can hear?  Will the deer detect the flash in the pan and “jump the flash”?  (We still argue about that one.)  Am I in tune enough with my rifle to take my deer without a second shot, without telescopic sights, or with the poor ballistics which a round lead ball affords?  Because of all this, game taken with a flintlock has always been a memorable time.  I probably can’t tell you about my first deer; but I can write a story about my first deer with a flintlock rifle.

    Hunting deer with black powder is just getting your feet wet though.  Think of hunting rabbits with a good beagle and a double barrel black powder shotgun.  Mine used percussion caps instead of flint.  No matter.  After shooting at the rabbit you learn to step to one side to look around the smoke to see if you connected.  Hunting with a black powder shotgun is a bit more leisurely; your friends need to wait a bit longer while you reload.  My black powder shotgun was just the thing for quail and pheasant too.

    Hunting with black powder sooner or later leads to target shooting.  Almost anywhere you might live, there is a black powder club near by.  Our club range has provisions for target shooting at 25, 50, and 100 yards.  Monthly shooting competitions may include targets for flint and percussion rifles, pistols, and chunk or bench guns.   After a match is over someone might pull out his portable trap, and the muzzleloading shotguns begin to speak.  We may even have a flint smoothbore in the group.

    If any of this grabs your attention, contact your local black powder club.  You will find members that want to help you with the challenges that traditional black powder shooting can bring.  You might get so involved that you want to acquire the woods skills of a Simon Kenton, Daniel Boone, or John Colter.  Someone in your local club can show you how to manage your new flintlock, make a flint/steel fire, and cast lead balls.

    There, maybe you haven’t realized it yet, but you have just been reeled in.  Maybe it was deer hunting with a flinter, maybe it was the black powder shotgunning, or maybe it was shooting X’s on a paper target.  But you have been caught just the same.  When you have been hooked, set the bait for your friends.  Better yet, troll the black powder “bait” in front of kids. Teach your son or daughter to shoot a black powder gun.  Whether you call it muzzle loading or black powder, it’s a great family sport.

    Larry Pletcher has been actively involved in black powder shooting sports for almost 30 years and has written articles for MuzzleBlasts, the NMLRA’s monthly magazine. While he enjoys all shooting sports, his passion is the flintlock.

  • The Eight O’clock Turtle

    The Eight O’clock Turtle

    I didn’t meet the eight o’clock turtle until the 2014 Spring Shoot. He was probably there for years, but I never looked for him.  He seems to live under the bridge at the entrance to the NMLRA grounds.  I saw him first on Saturday morning at 8:00 am.  (Wait, he may be a she. I don’t know, but from here on the eight o’clock turtle will be a he. )

    He was sitting in the shallow water at the southeast corner of the bridge.  His shell was maybe 9-10 inches front to back; pretty big for a painter.  He was motionless with the top of his head just above the surface.   I took his picture and went on my way; I had people to meet and figured I wouldn’t see him again.  An hour later, when I went back to the camper he wasn’t there.  I crossed the bridge a number of times later in the day, but he was gone.

    Eight O'clock Turtle

    The next day I happened by the bridge about 8:00, and there he was.  He was in the same spot, motionless, with his head just breaking the surface.  I began to think this was part of his routine.  At 9:00 he was gone.  Maybe that was part of his routine too.

    I looked for him at 8:20 the next day, but he wasn’t there.  He only came by at 8:00.  I never saw him after that.  I couldn’t seem to hit his narrow schedule.  I never saw him arrive or leave. I only know that at 8:00 AM he was there.

    I related the eight o’clock turtle’s story to campers near us at an evening campfire.  A friend told me she saw him at 8:00 one morning too.  Between us, we had three sightings, but all were at 8:00 in the morning.  Where he spends the rest of the day, we don’t know.

    With the spring shoot over, I won’t have a chance to check on the eight o’clock turtle for some time.  However, I plan to be at the bridge on the opening day of the 2014 Fall Shoot at 8:00 AM.

    (This turtle story takes me back some 30+ years when my son, Kevin, went with me to Friendship.  We saved a box turtle on the Friendship Road on that trip and others on successive trips.  Kevin still remembers the box turtle but couldn’t go to Friendship this year, so he missed the eight o’clock turtle.)

  • Lancaster Trip

    Lancaster Trip

    Lancaster County — The Search for Samuel and Henry Pletcher

    Our search begins with tracking down a rumor that the name “Pletcher” was carved in a wall at Valley Forge.

    We stop at the Mennonite Historical Society.

    Valley Forge – Tuesday, May 26

    Our first day began with a drive from Lancaster to Valley Forge to look for a “Pletcher” reported to be carved in a wall there. We wondered if it might have been Henry who was a member of the Lancaster Co. Militia. We first went to the Welcome Center and wandered through a number of elementary school classes on field trips. That brought back some memories good and bad.

    I asked about any lists of soldiers that might have been at Valley Forge and was led to a computer data base available to visitors.

    We tried all versions of the name Pletcher but found nothing. We then found out that all the soldiers at Valley Forge were Continental Soldiers – no militia groups were quartered there. That ruled out Henry’s unit. Also we were told that no original huts existed, ruling out the likelihood of a Pletcher name being found.

    We used the CD to follow the car tour of the grounds. While Valley Forge is an interesting historical site, we struck out when looking for family history.

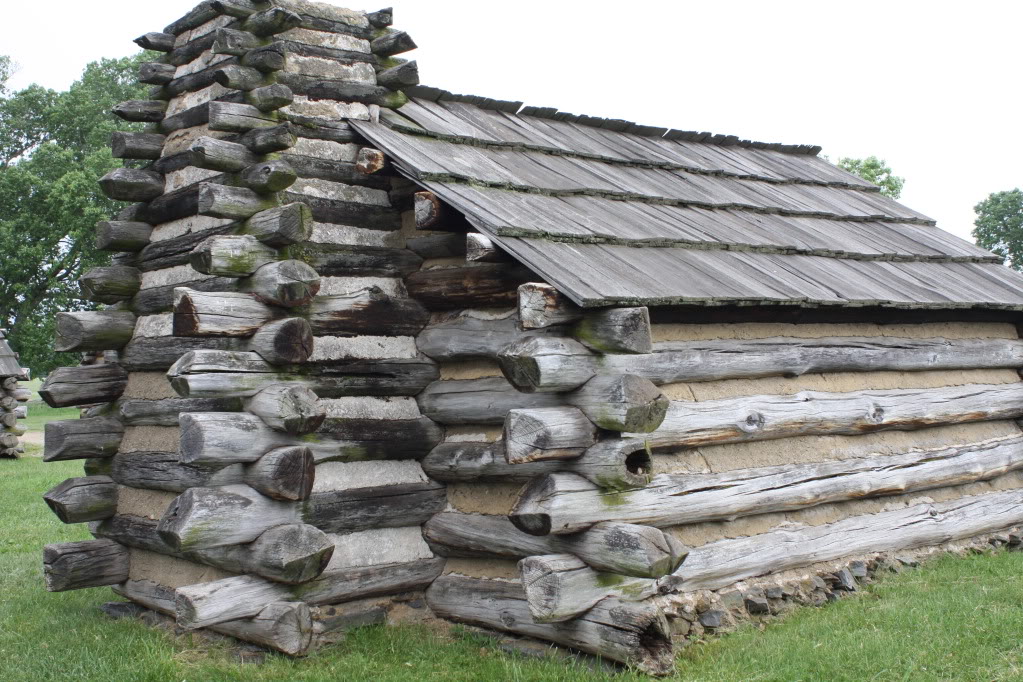
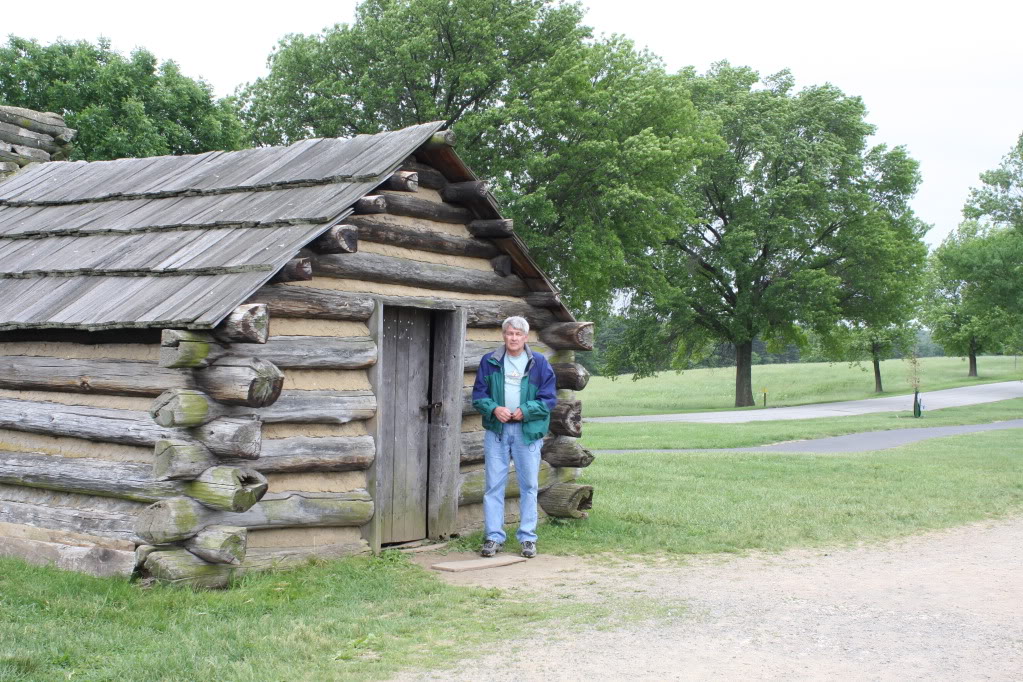
    Above is another of the log huts built to General Washington’s specifications. The huts here are modern reconstructions.

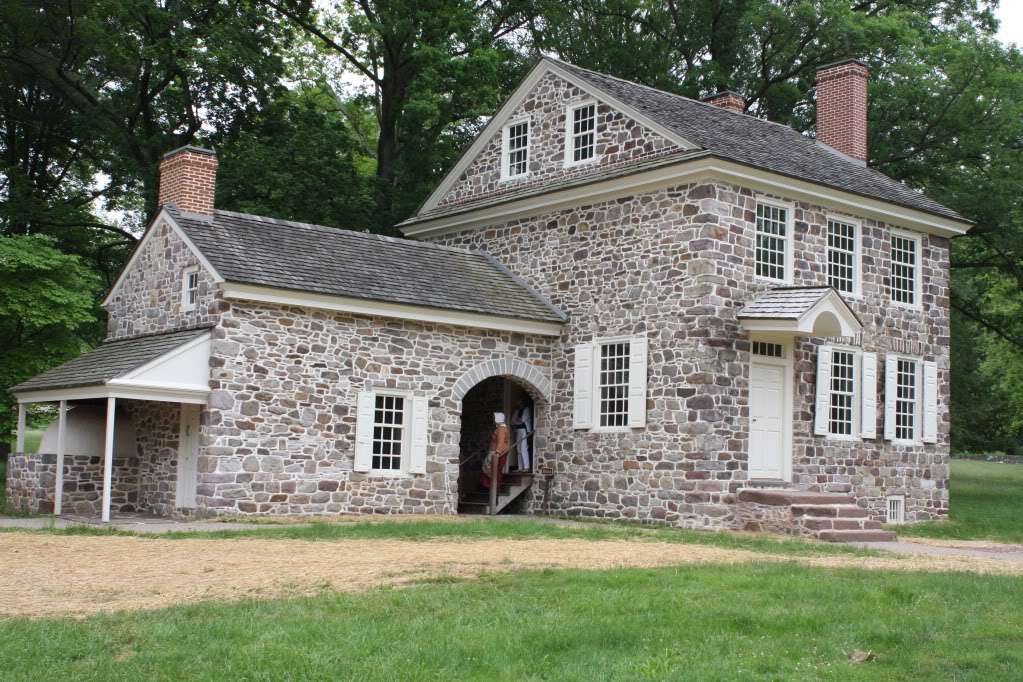
    Below is the stone house that housed Washington and his staff. He rented this house and used it as the 1770’s version of the Pentagon.

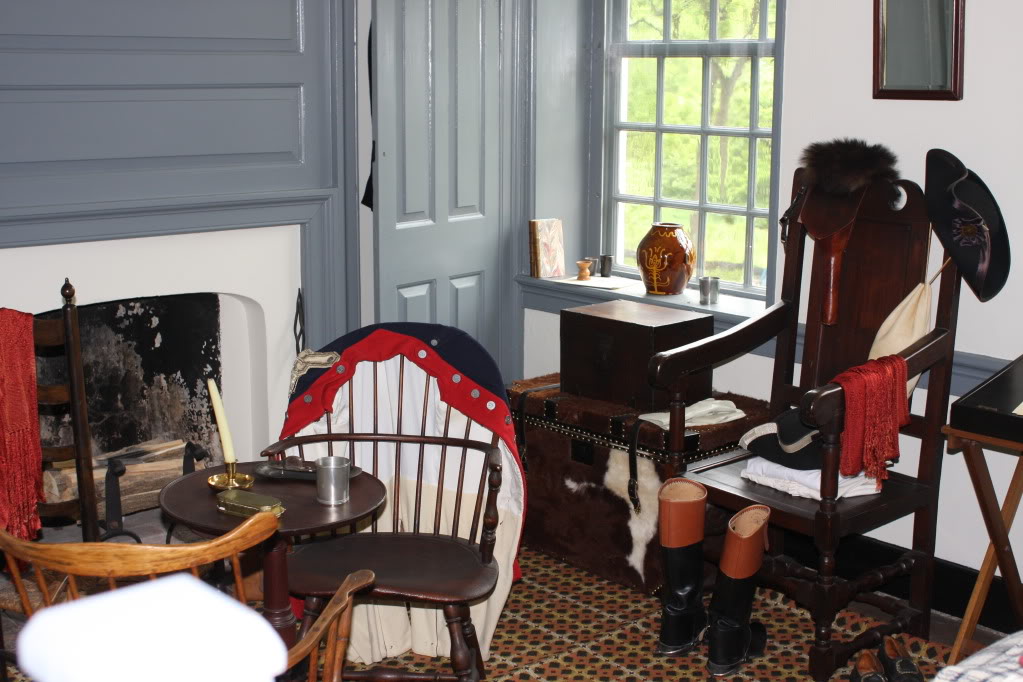
    Here is one of the rooms Washington used.

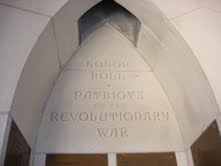
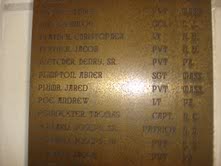
    A correction needs to be added here. Lynn De Grave is a Pletcher relative living in France and supplied new information to me about the Henry Pletcher name at Valley Forge. We were looking the wrong place. Lynn found Henry’s name in the carillon tower at the Washington Memorial Chapel. Henry Pletcher Sr is on the DAR memorial list. Below are photos of the location:

    We returned to Lancaster in the afternoon and stopped at the Mennonite Historical Society on US 30. There we found a wealth of information about the Pletchers. One book specifically was a great help. It contained some material which we already had, but much was new. Because it was near closing time we decided to begin our second day there to continue looking. That evening we contacted the author by phone and requested a copy of the book. While a delay is expected because of health issues, the author agreed to produce a copy for us.

    Lancaster – Wednesday, May 27

    Wednesday we began at the Historical Society and found additional information in a periodical. The article was on the Schenck family connection. It included information that will be of help when we go to Howard PA. The book store upstairs had back issues so we bought a copy. We also went through the Pletcher book and made notes. I brought my camera in and took photos of important pages. We realized that since we had a chance to speak with the author the night before and request a copy we only photographed important pages.

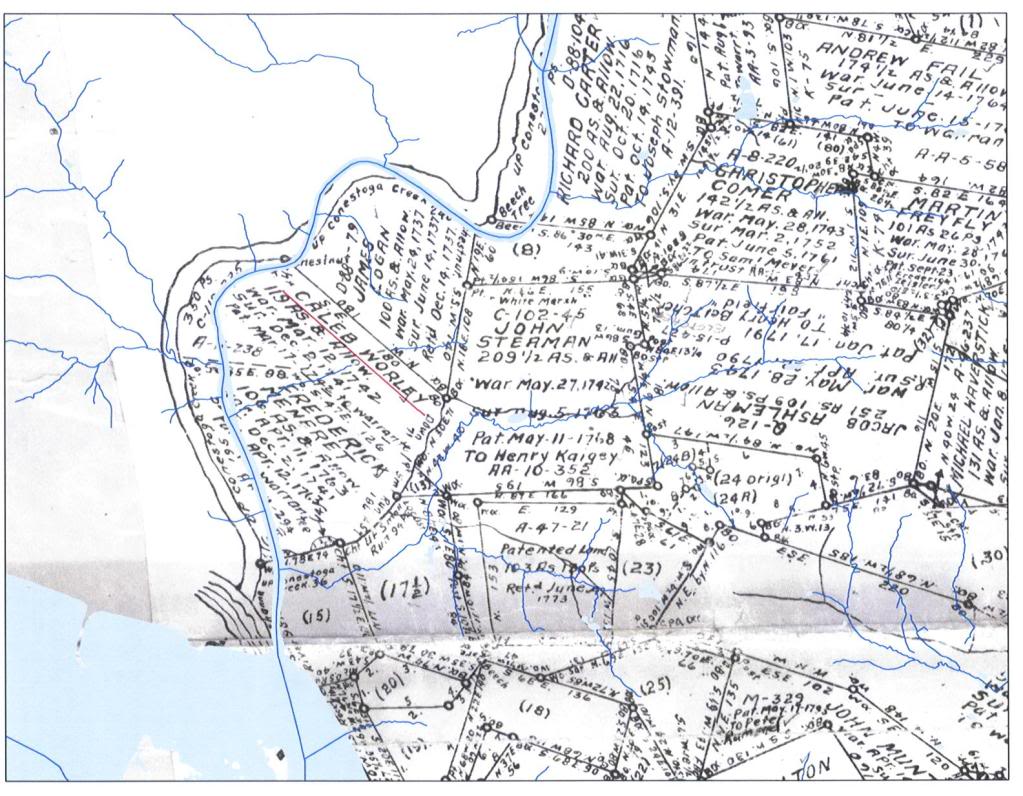
    Our next stop was the Court House. We wanted to see if we could find a copy of the deed for Frederick Maynard’s property. His farm would have been the farm where Samuel and Henry grew up. What we found was a copy of the transaction when Frederick bought the property. Taking this to another desk we found a map from the 1700’s that showed the area with owners listed. A modern map was superimposed, showing modern roads and current path of Conestoga Creek.

    Below is a map of Lancaster. Conestoga Creek is marked in red near its mouth.

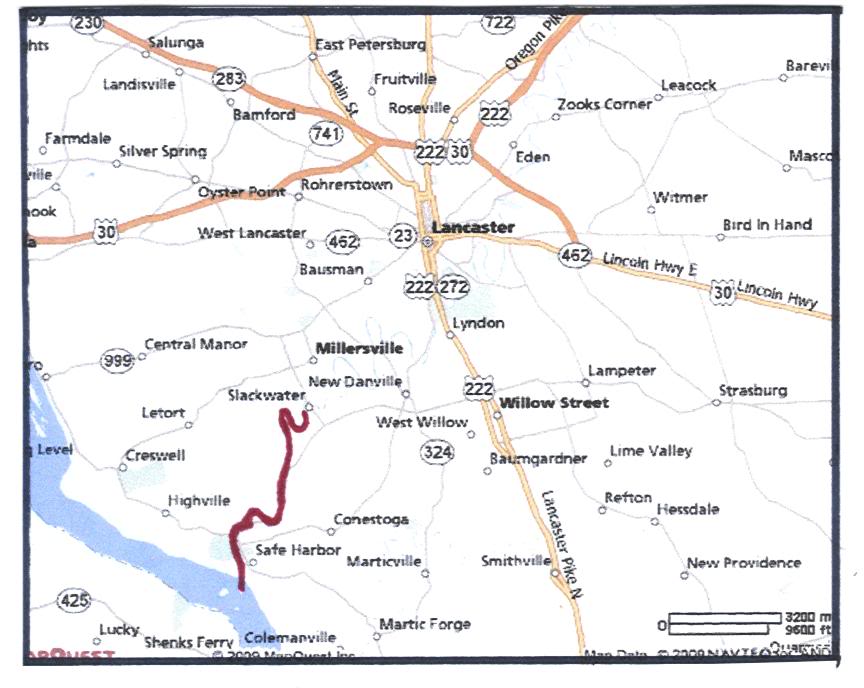
    Below is the same area enlarged. Conestoga Creek is again marked in red.

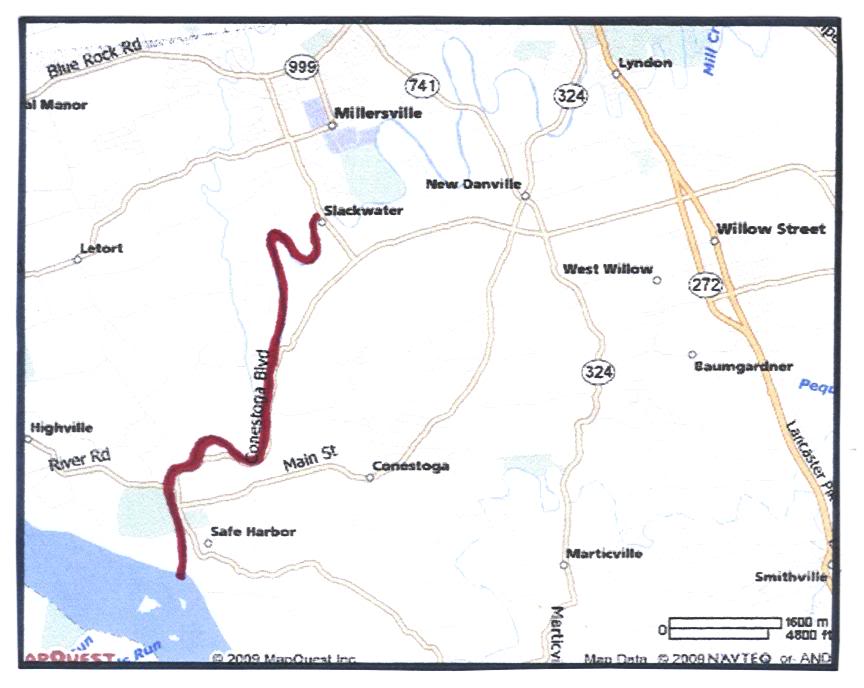
    Below is a map showing Conestoga Creek. The bends in the creek help to locate Frederick Maynard’s farm.

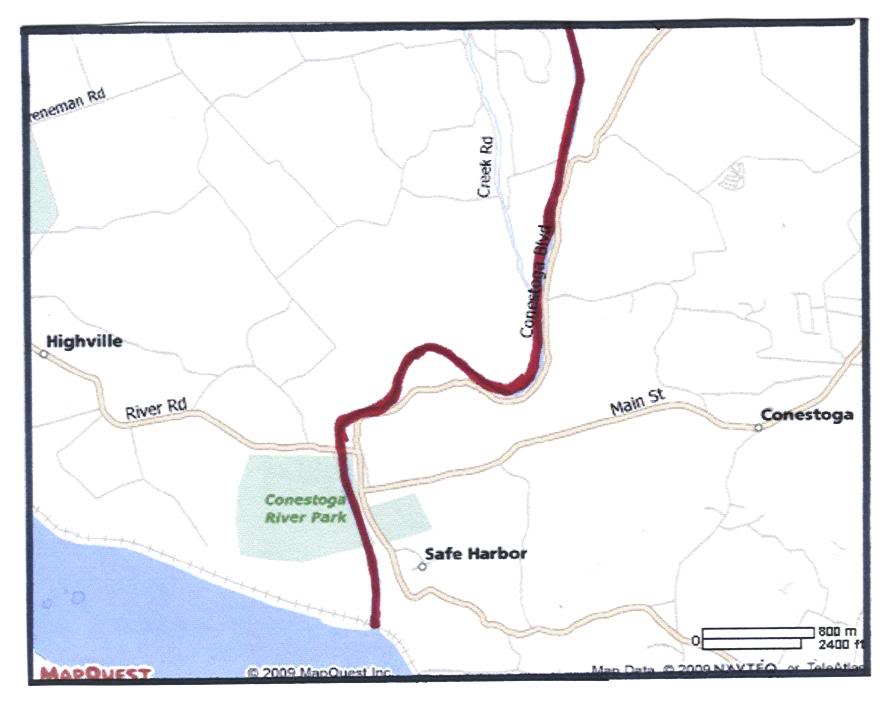
    Below is the map showing the property that Caleb Worley sold to Frederick Maynard. This is the farm where Samuel and Henry Pletcher grew up.

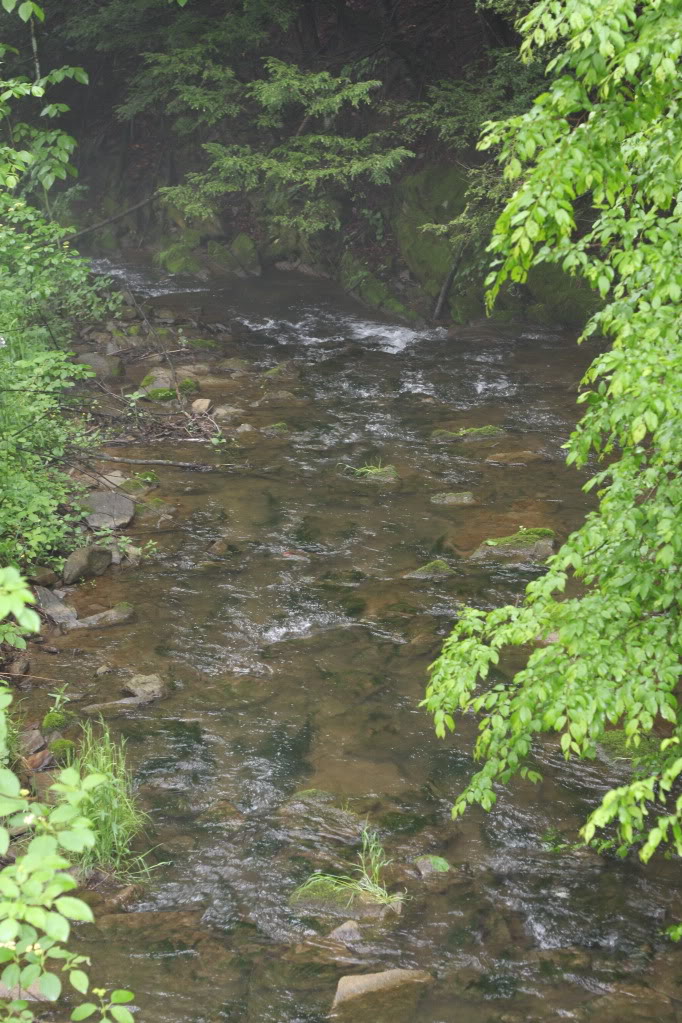
    After lunch we headed for Frederick Maynard’s farm. We traveled to Safe harbor along the Susquehanna River and followed the road along side of Conestoga Creek. With the creek to our left and Maynard’s property to our right we followed the road through the western part of the property eventually finishing the loop and ending up back at Lancaster. Along the way we stopped and took pictures – mostly along the creek. One bridge crossed Conestoga Creek at a shallow riffle.

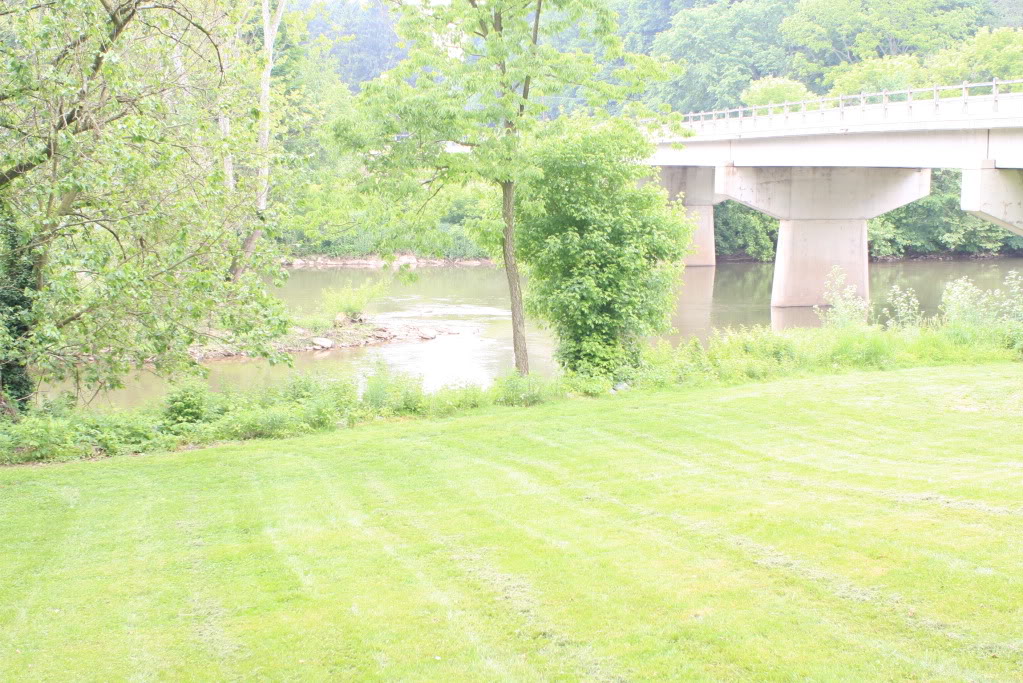
    We expect folks would have forded the creek here because of the shallows. The bridge was added here much later because the roads would have led to the ford.

    Howard – Thursday, May 28

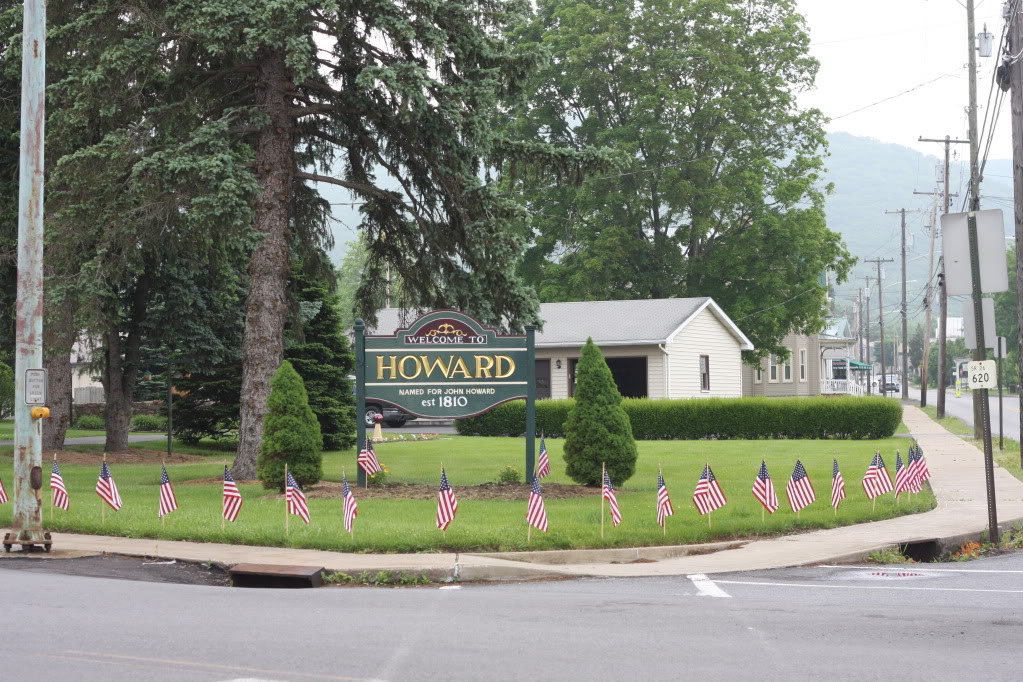
    We left Lancaster and headed for Howard hoping to use the same route that Samuel would have used in 1790 when he made the trip by wagon. He followed the Susquehanna River north along the east bank until he reached the Juanita River. Then he followed the Juanita River west and north until he reached the valley where Howard would later be founded. For us it meant following RD 322 most of the way. We used RD 150 to enter the valley and followed it along the north side of the valley until we reached Howard. The reservoir dominates the view of the valley. The town of Howard is protected by a large dike on three sides. The unprotected side of Howard is where Gap Run comes into the valley.

    We followed the road through Howard toward the Gap. As we left town the sides of the Gap, the road and creek took all the room. The road was closed over by trees.

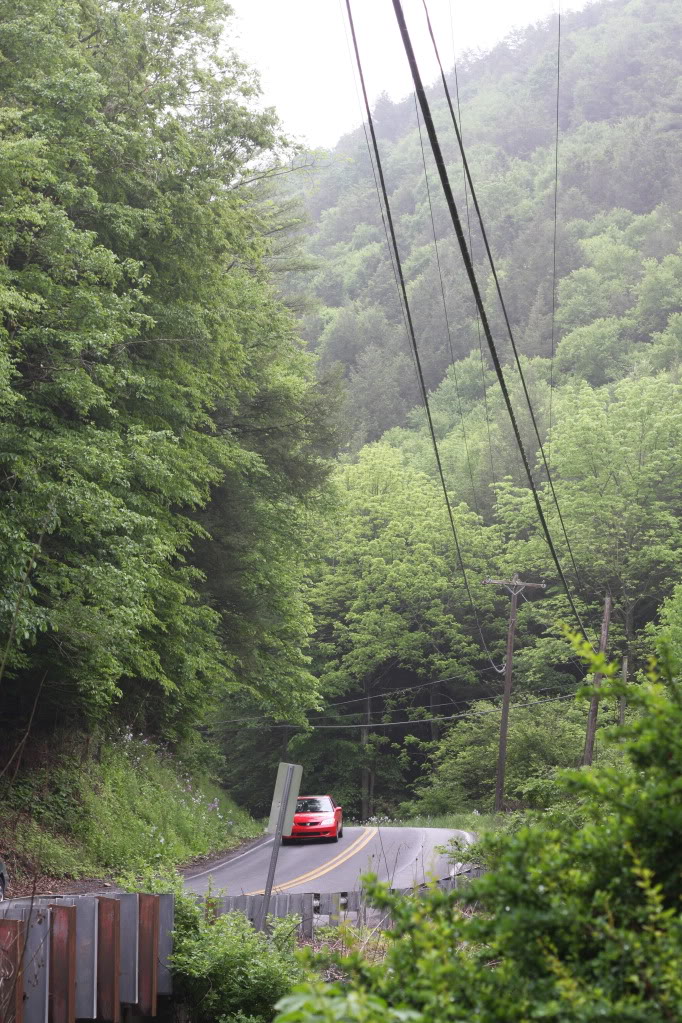
    Maybe this the way Gap Run looked to Samuel in 1790.

    As the Gap opened up, we turned around and went back into town. We decided to try the Post Office, hoping to find the cemetery. The Post Master did not know, but an old codger coming in had good advice. He told us to check with Carolyn Hollar because she was a Pletcher and knew everybody. He also suggested that we stop at the Fire Department. He said, “There are always old codgers over there.”

    We tried Mrs. Hollar but got no answer at the door. We went to the Fire Dept. next. No one was there, but a car drove up with Earl Thompson and his wife inside. Earl was full of information. When I asked about Henry’s cabin, he said, “I know where that is, but it’s under water. He told me to stand on the dike at the end of Main Street and look left. He also told me that Main Street was the old 220 that my text described.

    These next two photos look out over the lake where Earl described the cabin.


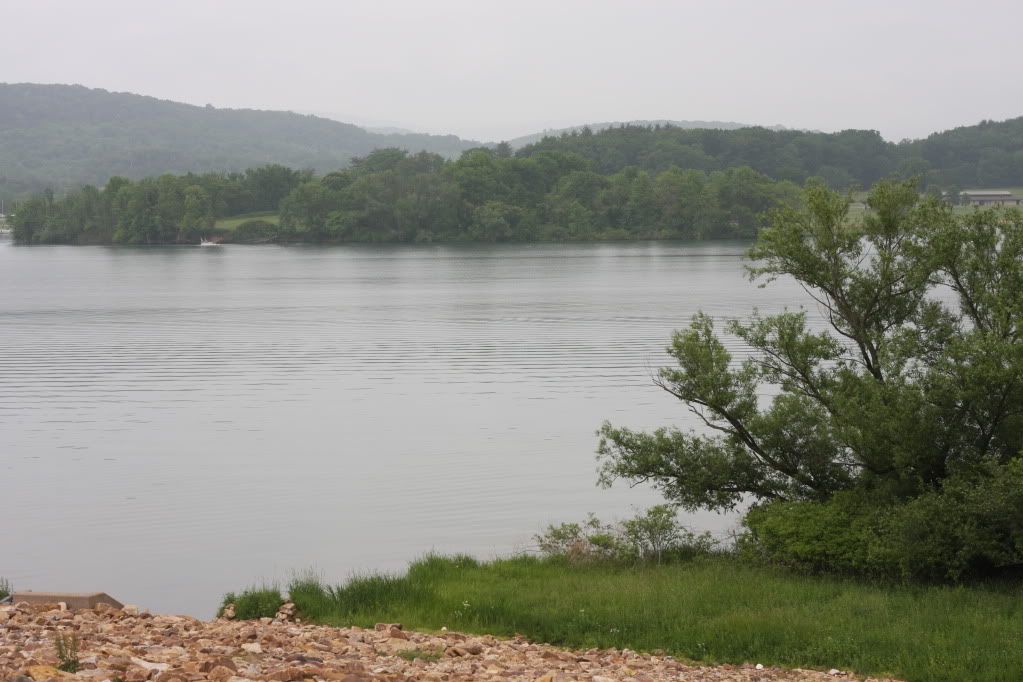
    Mrs. Thompson told us that in April the reservoir was drawn down to the creek level. At that time you could see exactly where the creeks were and use them to locate other positions. They both encouraged me to walk the dike and get an idea about the various submerged locations. They also said to go back Mrs. Hollar. She would be invaluable.

    As I walked along the dike going back to the car, I lined myself up with Main Street (Old 220) and looked back across the dike. I saw an old, moss-covered asphalt lane. I was looking at Old 220 as it disappeared into the trees on its way down into the reservoir.

    Remembering that Henry Pletcher’s the first cabin was near where 220 crossed Gap Run, I walked as far as I could into the woods following the blacktop. Deeper into the trees I could hear Gap Run off to the right. I was probably within 50 yards of Henry’s first cabin.

    Besides the cabin mentioned above, there were other cabins that Samuel and Henry built. All traces of them are below the water level. I asked about a building that might have housed the distillery that Samuel ran briefly. No one knew where that might have been.

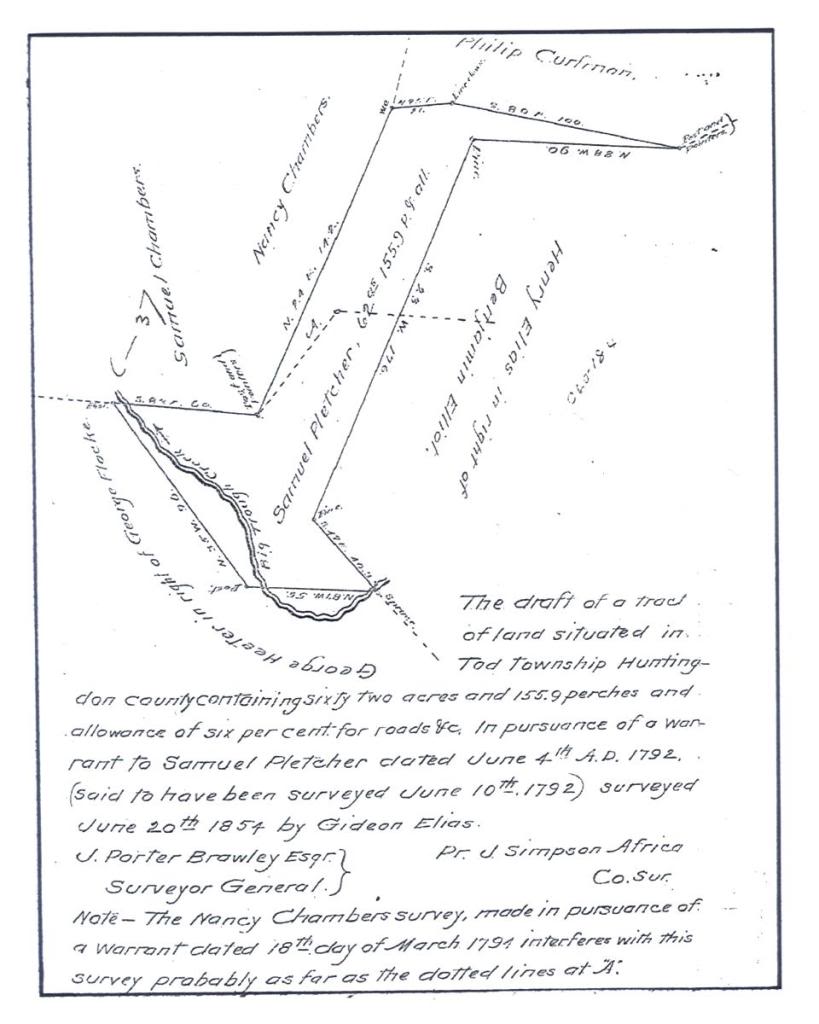
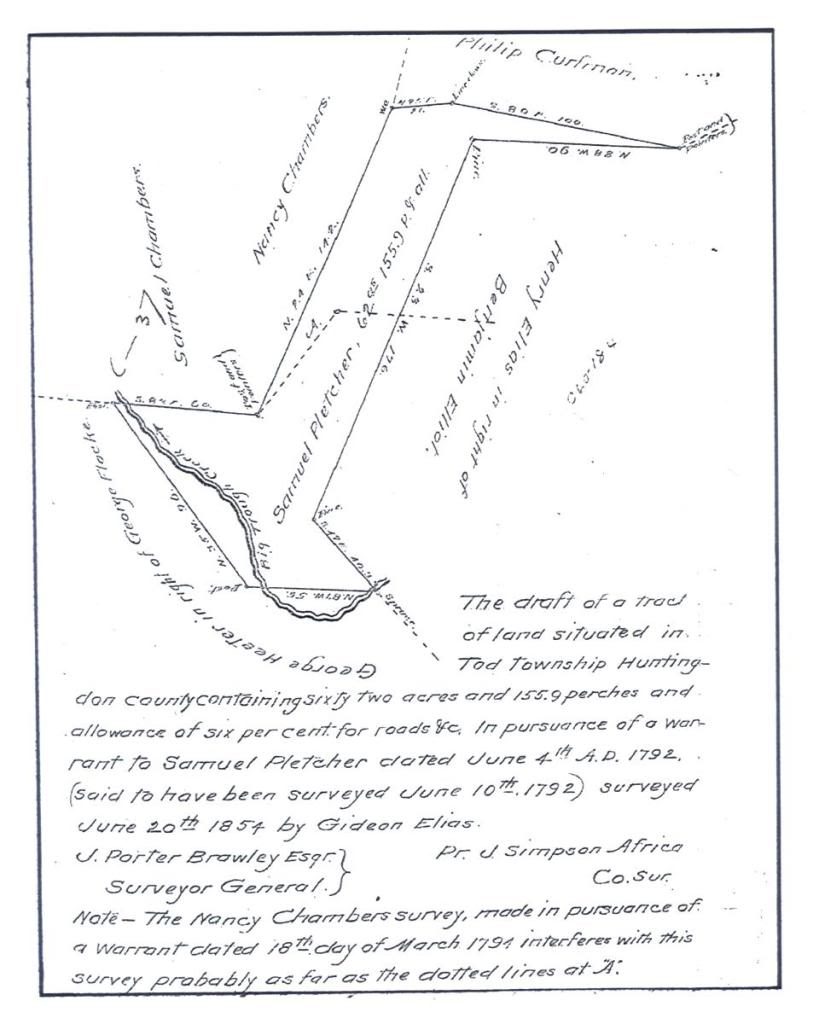
    The draft below was for a 62 acre piece of land Samuel owned in Huntingdon County. The survey was done in 1792. I don’t know if this is part of the ground under the reservoir.

    We left Howard without being able to speak with Carolyn Hollar. We would like to speak with her on the phone.

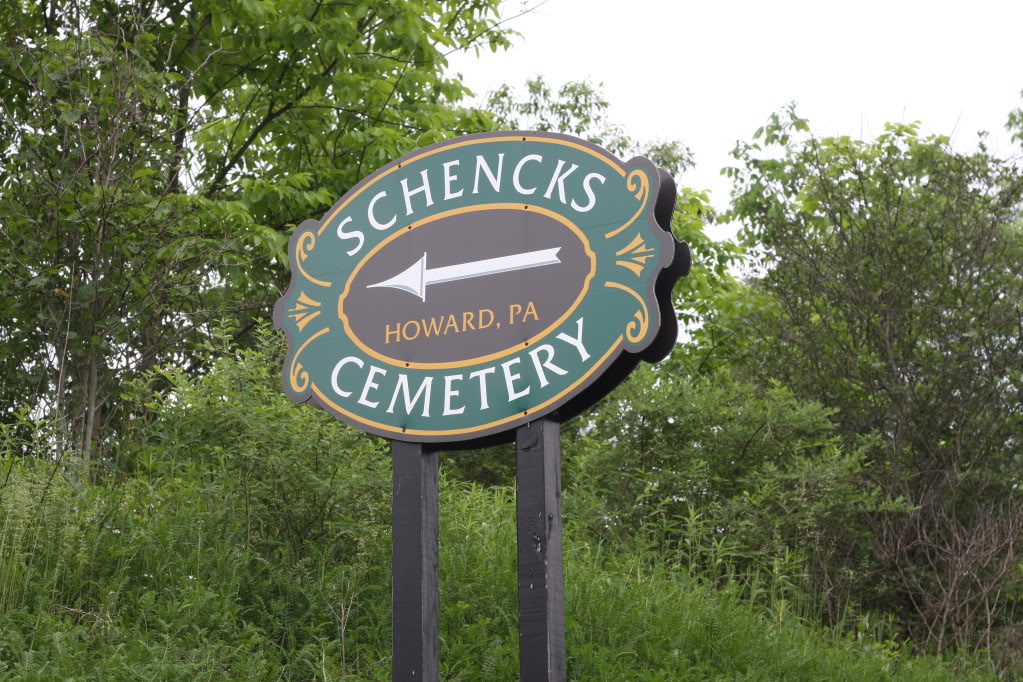
    The last person we spoke with was the town undertaker. He described the part of the Schenck Cemetery where we would find the Pletchers. This old portion of the cemetery was moved from the old Pletcher Cemetery that is now under water.

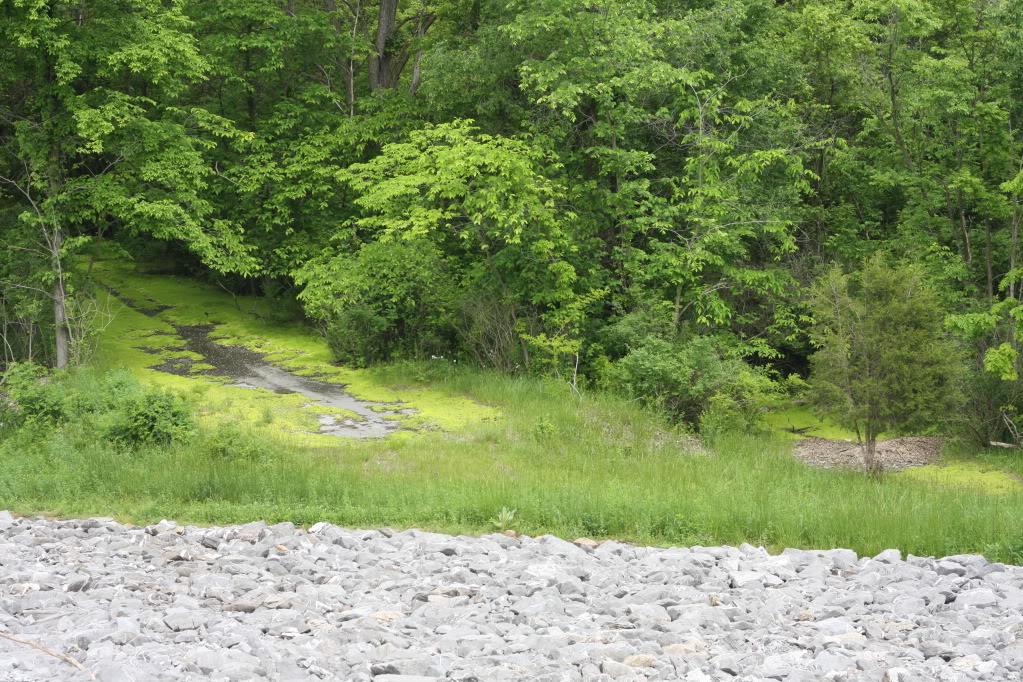
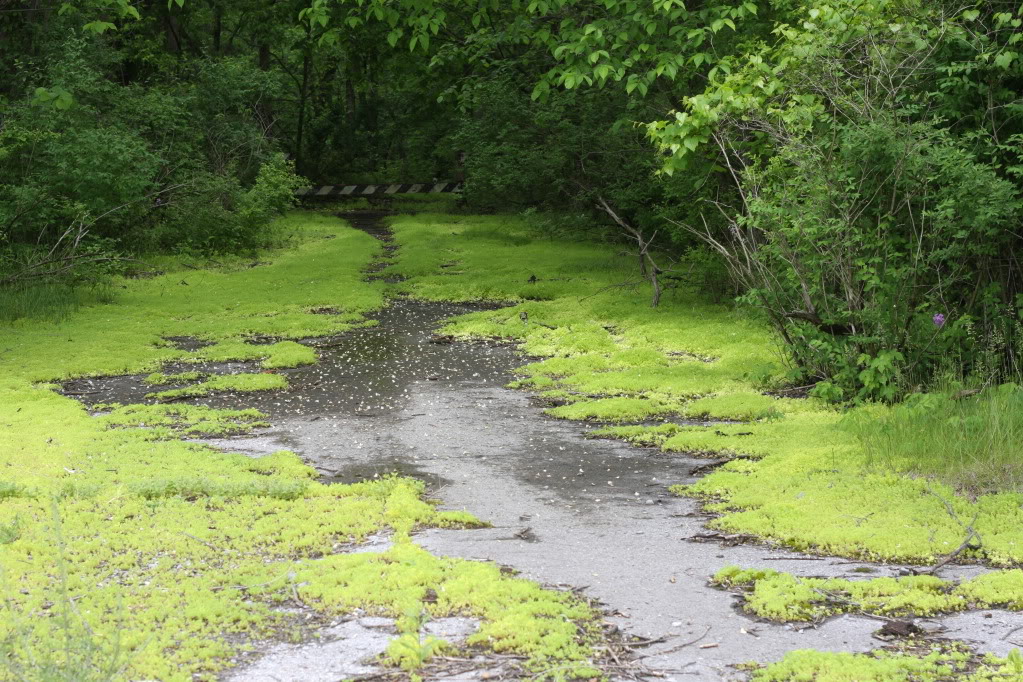
    While we found quite a bit of information, it was disappointing to see the Howard area altered so greatly by the building of the dams. Much of the original valley is under water, and the early cemetery was moved to a location on 150 west of Howard.

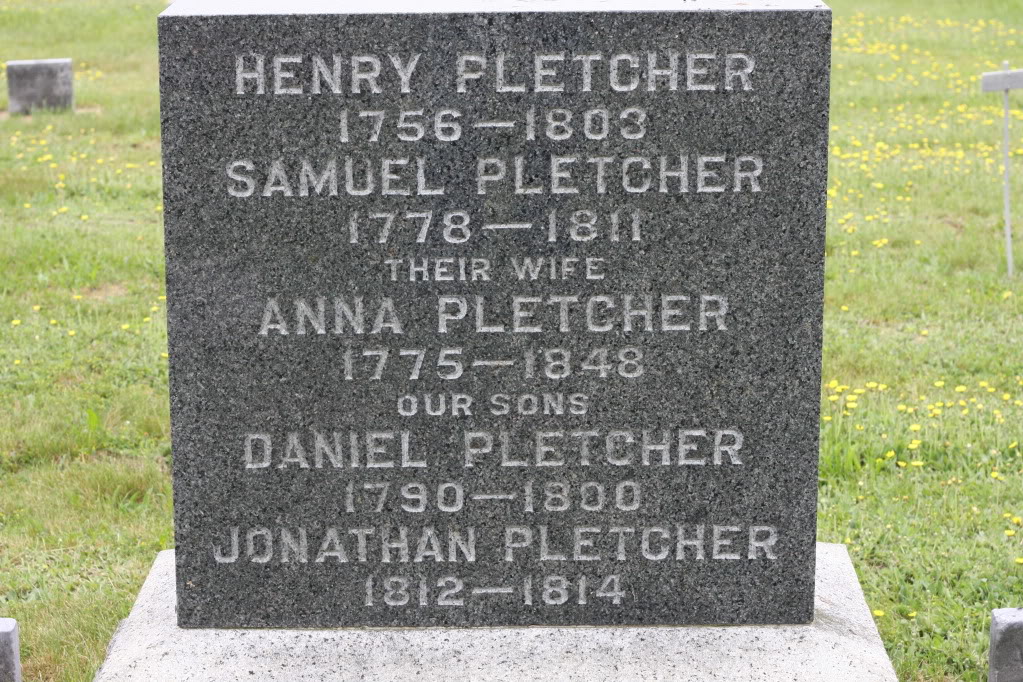
    We went to the cemetery and took photos of any Pletcher stone we could find. There were a number of second generation children and of course Henry. He died of complications from a horse kick in 1803. His son Daniel died at age 10 in 1800, and may have been the first Pletcher buried in the old cemetery.

    The caption on this stone may be confusing. Most stones don’t use the phrase “their wife”, however it is correct in this case. When Henry (Generation 1)was killed by complications of the horse kick, He left Anna Schenck Pletcher, his second wife as a widow. She then married her nephew, Samuel Pletcher (Generation 2), the son of Samuel Pletcher (Generation 1).

    Galion, OH – Friday, May 29

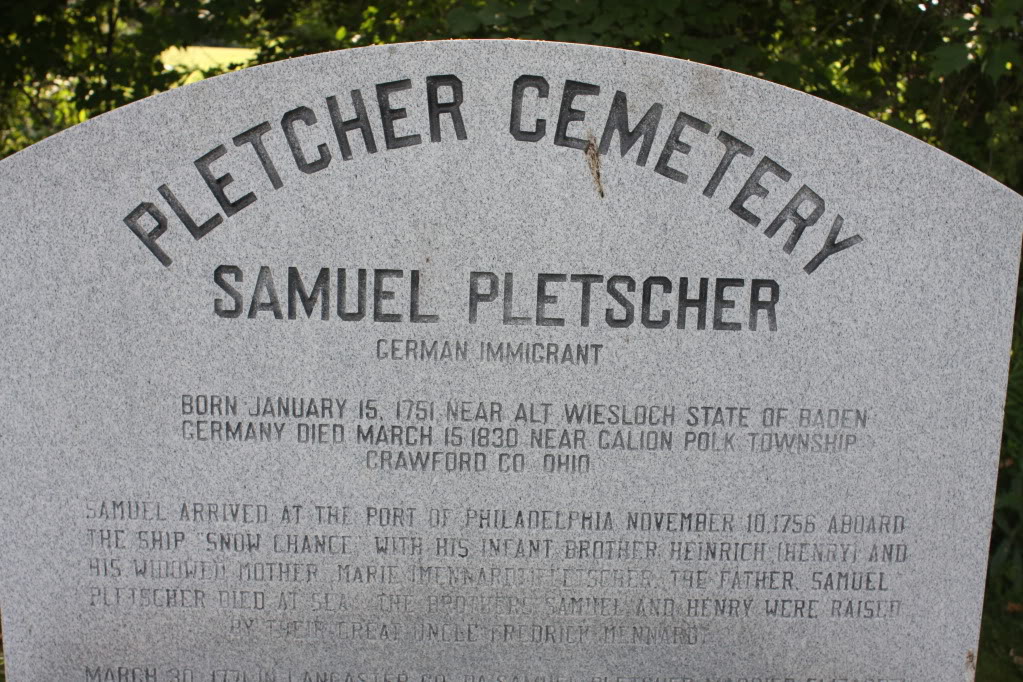
    In Galion, Ohio our luck changed from bad to good. Our first stop was Chamber of Commerce tourist information. We asked about the Pletcher Cemetery and were given directions to the Whetstone Cemetery. We were told that this is the cemetery we were looking for. As we left they told us that the town library might have more information.

    When we asked if anyone in the library knew of the Pletcher Cemetery, one lady said that she did. We were lucky, because she was there only one day a week. She found a book listing Ohio cemeteries and we ended up with a map to the cemetery and a listing of the grave stones. We took her name and address for future study.

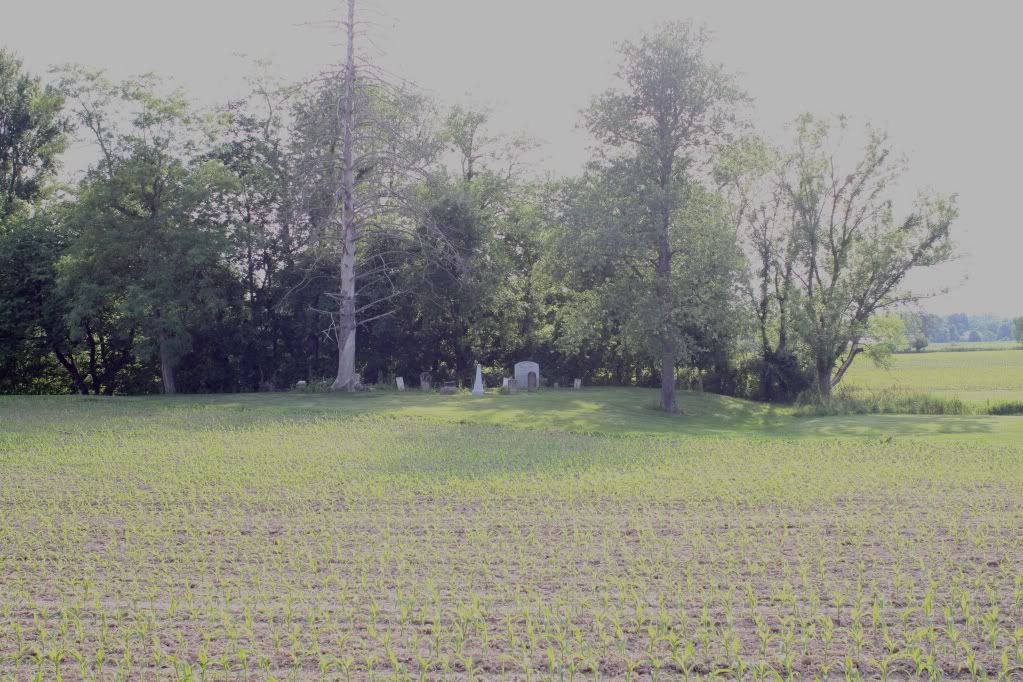
    This map shows where to find the Pletcher Cemetery. After you turn unto Beck Rd look to the right. You can see the stones from the road.

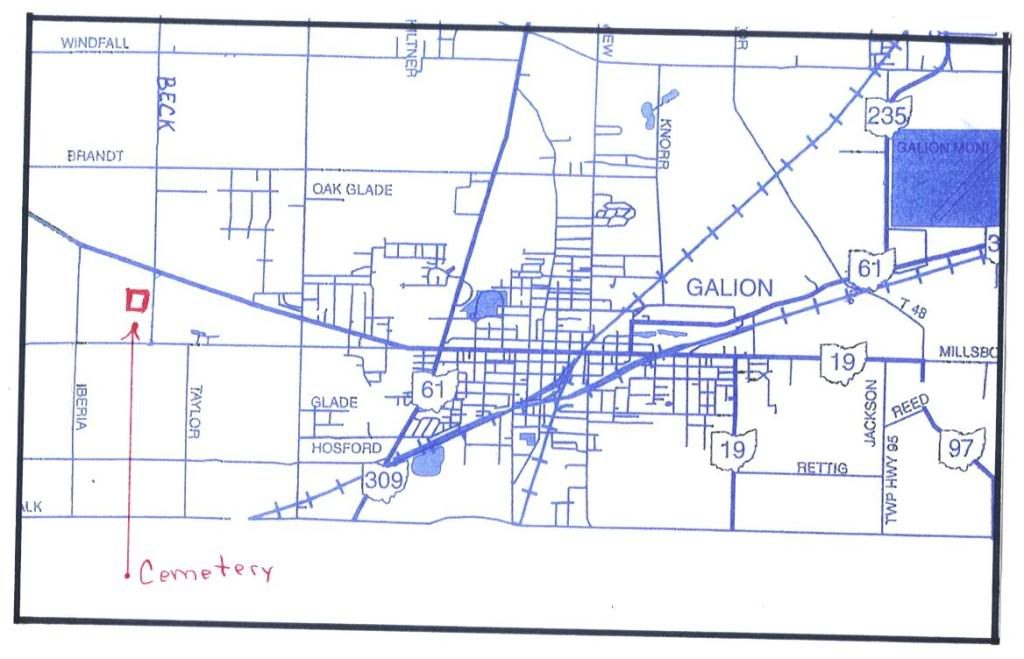
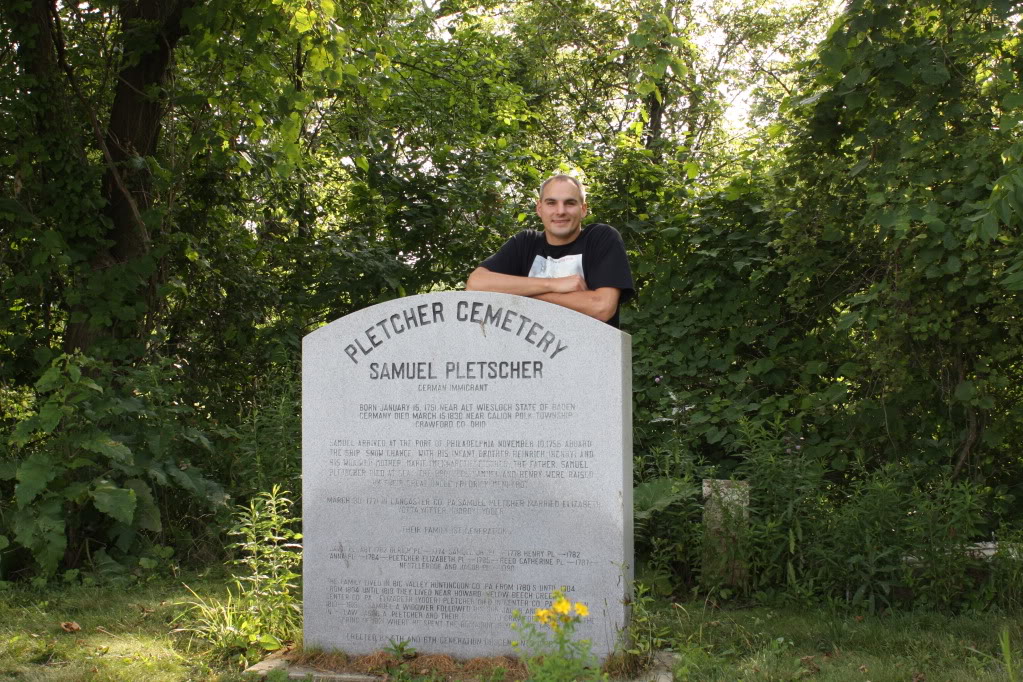
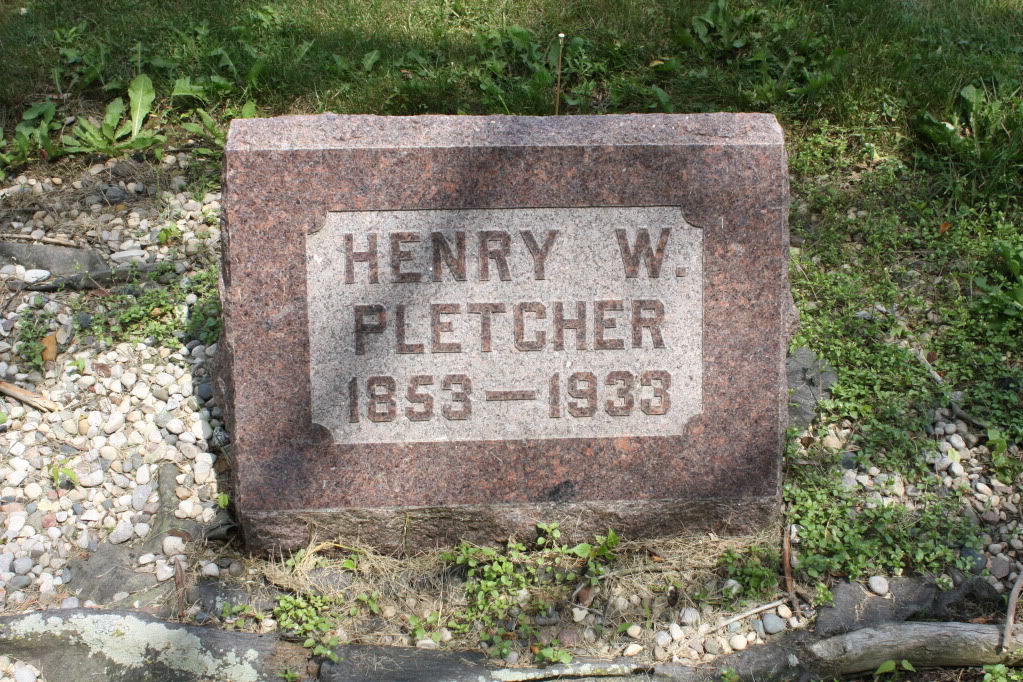
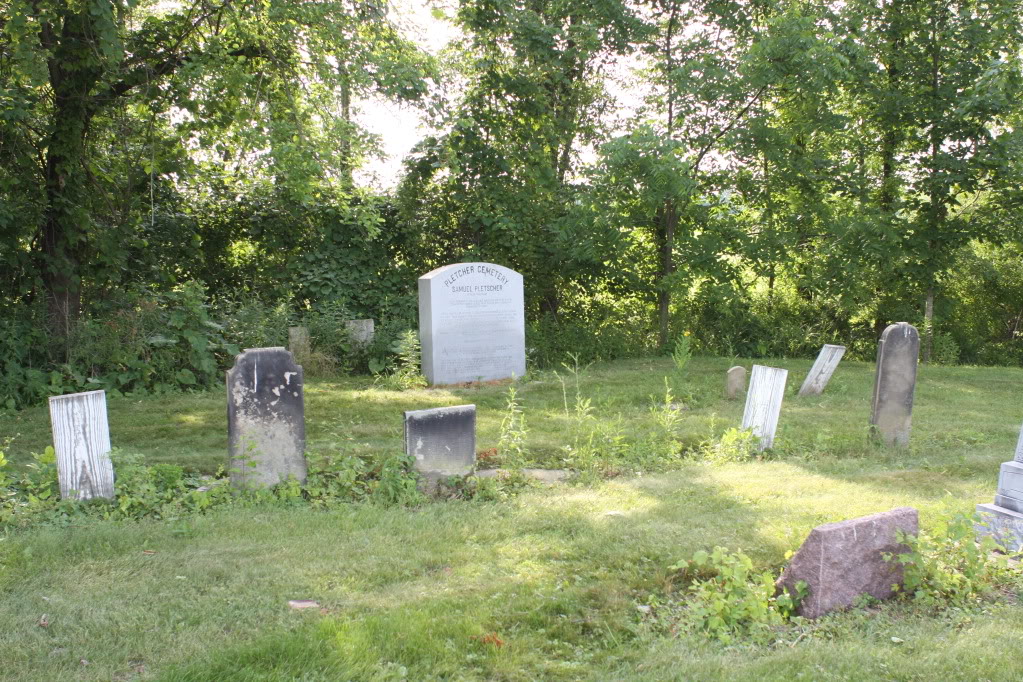
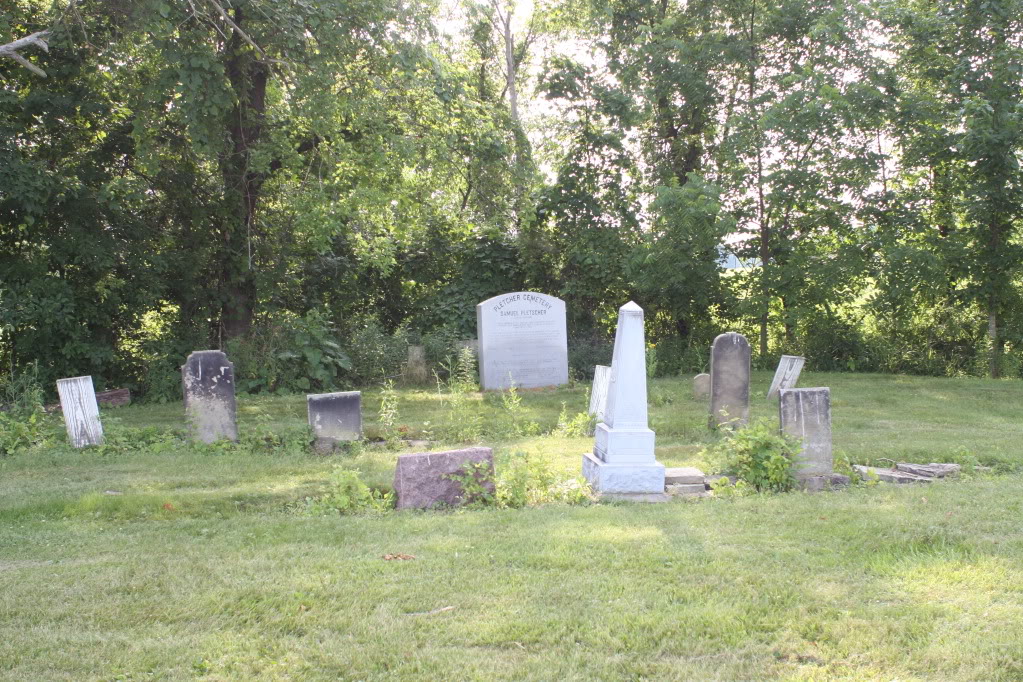
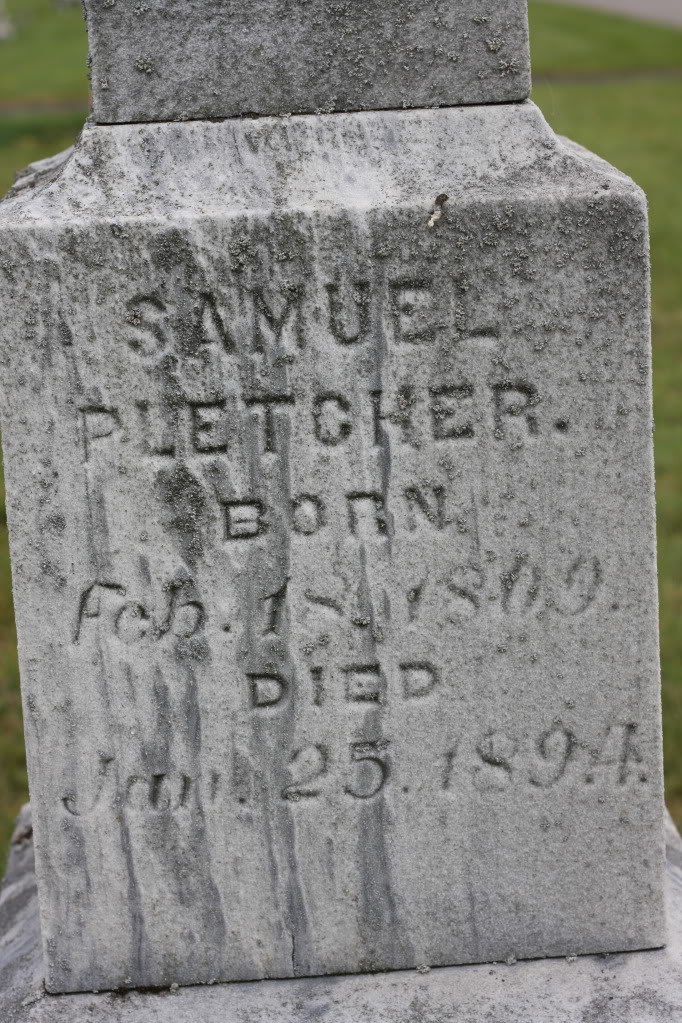
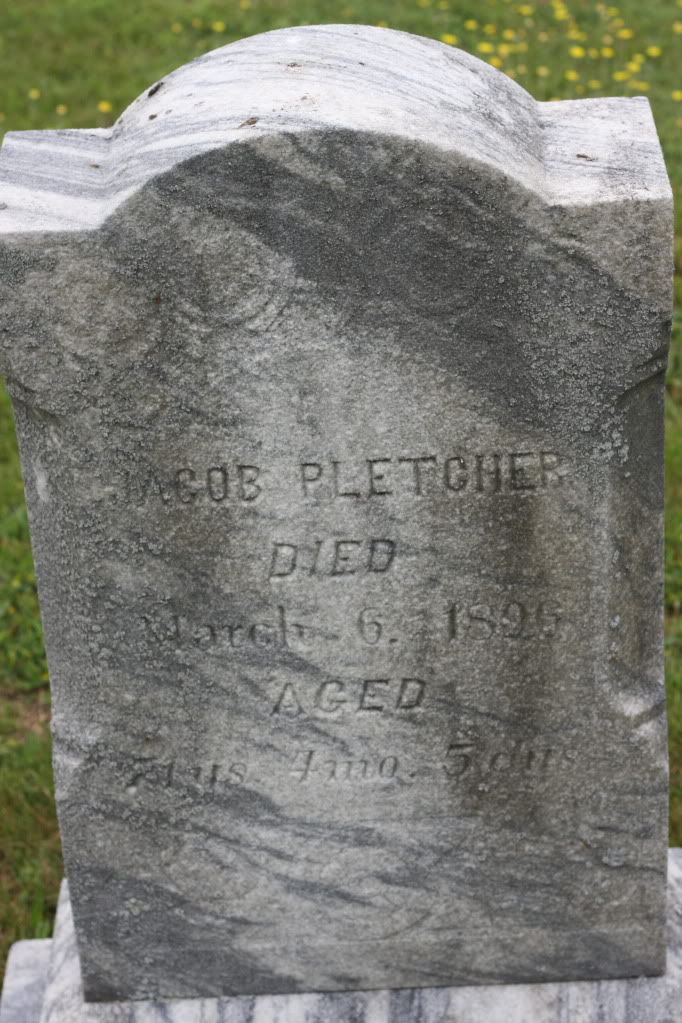
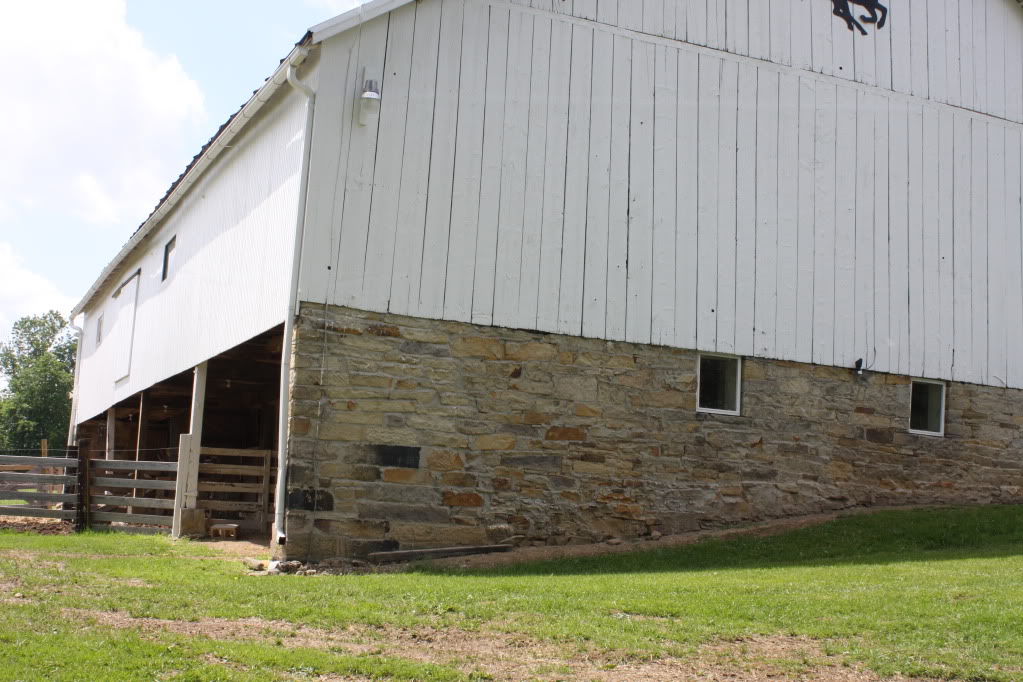
    We drove to the farm and asked permission to visit the cemetery. I also asked if the barn was original and was told it was. We found Samuel’s grave stone as well as Jacob N., his wife, and Henry W., the last Pletcher owner.


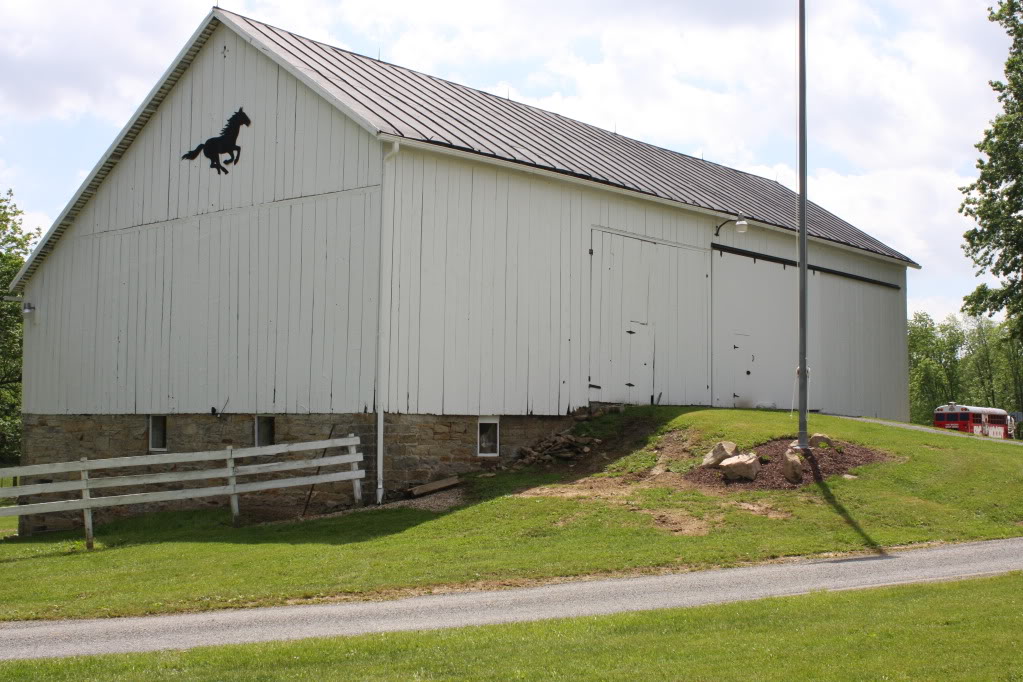
    On our way out we took photos of the barn. It was the only building we saw on the trip that was built by Pletchers.
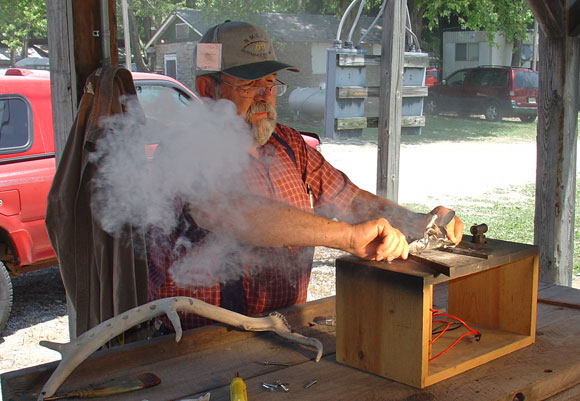
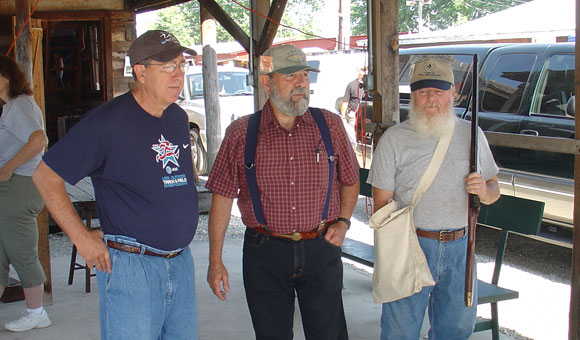
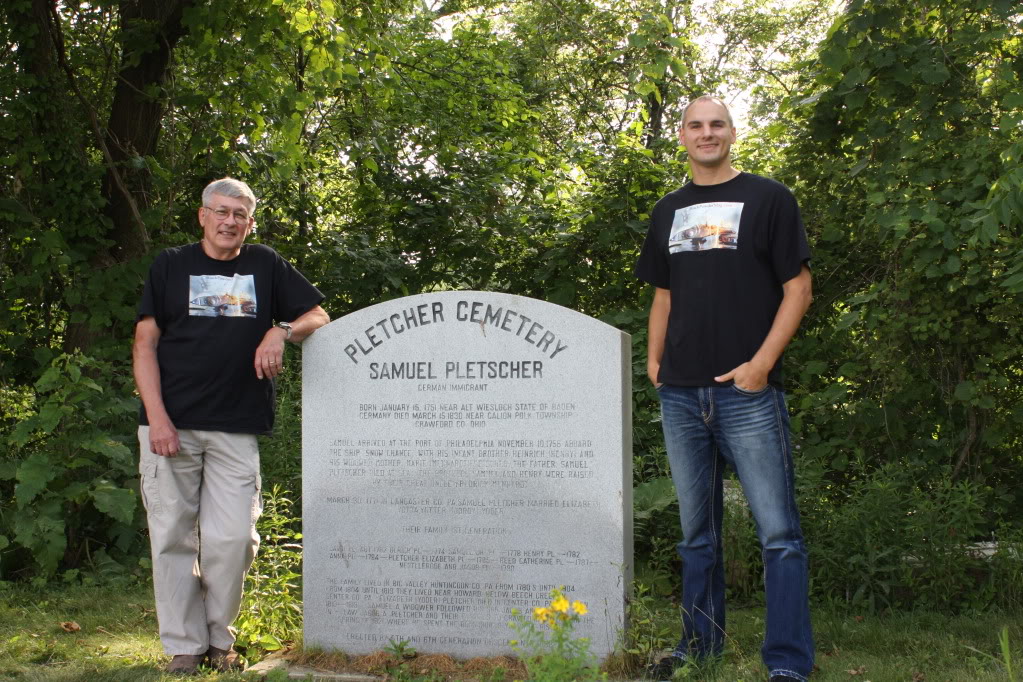


    2011 Addition

    In June 2011, Kevin went with me to a black powder presentation in Ohio. On our return, we stopped at the Pletcher cemetery to take a few extra photos. I wanted to have pictures of Kevin next to his great, great, great, great, great grandfather’s grave stone.